Will you continue to post pictures of you putting each piece together? I find those really helpful!! Really curious to see the taping of windows and seems.i think that they look great blinking, it just seems off that four on the sides blink and the one at the front center is solid. I’ll do some research on YouTube tonight when I get home! I can live with it not blinking it just seems odd. I would ask on Facebook in the build group but I’m not using Facebook at the moment.
-
Welcome! The TrekBBS is the number one place to chat about Star Trek with like-minded fans.
If you are not already a member then please register an account and join in the discussion!
You are using an out of date browser. It may not display this or other websites correctly.
You should upgrade or use an alternative browser.
You should upgrade or use an alternative browser.
Building the Eaglemoss Enterprise-D partwork
- Thread starter Leathco
- Start date
Will you continue to post pictures of you putting each piece together? I find those really helpful!! Really curious to see the taping of windows and seems.
I will do, in fact I will photo document any problems that I come across from now on and how I managed to resolve those problems in case it helps anyone else. On Monday I will post about the front formation light, a problem with which I have managed to resolve.
In the meantime…
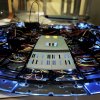
Work on the underside of the saucer section has commenced!
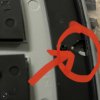
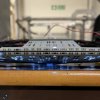
Ok, so when you install the front formation light, you need to use a screwdriver or scalpel to make a tiny indent in the black panel holding the saucer rim in place:
Next you need to put the light in to the small plastic reflector panel and use insulation tape (or any tape? To hold it in to place. do not cover the bottom navigation lights though.
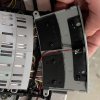
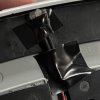
This has been one of the trickiest parts of the model for me to resolve so far but has an easy solution. Hopefully I won’t need to do this for the other formation lights, but I know what to do if this is a problem in the future.

Next you need to put the light in to the small plastic reflector panel and use insulation tape (or any tape? To hold it in to place. do not cover the bottom navigation lights though.


This has been one of the trickiest parts of the model for me to resolve so far but has an easy solution. Hopefully I won’t need to do this for the other formation lights, but I know what to do if this is a problem in the future.


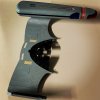
Well, a little teaser pic of some of my recent work on the model. I’m reluctant to post in this thread as I think that other people might have given up on the model as no one else is replying any more? I don’t want to post to myself and definitely don’t want to get warned off a moderator for spamming or multiple posts in a row… any takers?
I have an archive of photographs ready to upload on to here which illustrate the problems I have had with the model up until now, and explanations as to how I resolved the problems. It must only be me having these problems though? It’s a long story, but I work in a school and we have a really cool Caretaker, I’m building my model in the school boiler room (it’s a bit like engineering on the Enterprise) and every time I have a problem he either has the insulation tape, larger screws, batteries, Stanley knife or super glue I need to advert disaster.Hey - I'm still reading! I have a question I'm going to upload shortly - it just needs images and they seem a faff to upload on TrekBBS.
Watch this space, Tim - your wisdom needed!
BTW, hi Mogh, long time no speak!

I have an archive of photographs ready to upload on to here which illustrate the problems I have had with the model up until now, and explanations as to how I resolved the problems. It must only be me having these problems though? It’s a long story, but I work in a school and we have a really cool Caretaker, I’m building my model in the school boiler room (it’s a bit like engineering on the Enterprise) and every time I have a problem he either has the insulation tape, larger screws, Stanley knife or super glue I need to advert disaster.
BTW, high Mogh, long time no speak!
My main issue is that some of the damned parts don't actually line up properly - nothing to do with fit as far s I can see, there are just sometimes gaps and misalignments. Photos forthcoming!
Hey Tim!
I managed to noticeably get rid of most of my gaps, any remaining are acceptable.… don’t expect the model to be perfect, though you can get a good alignment between panels. Don’t go in to this expecting it to be a perfect recreation. Look at the studio filming models up close and they are far from perfect themselves! The paint jobs are atrocious!My main issue is that some of the damned parts don't actually line up properly - nothing to do with fit as far s I can see, there are just sometimes gaps and misalignments. Photos forthcoming!
Hey Tim!
My main advice would be don’t tighten all screws up at once, be gentle when tightening screws… if a screw becomes loose and won’t tighten any more use an FM screw haha! FM screws have solved all loose screw issues for me so far, we just get very few of them spare!
I may not respond every time but I am looking at everything posted on this thread. All builders, please continue to add progress images. And please, try to add something to photos that show the scale of what's being viewed. I imagine the fantail section in post #206 is gigantic?
Same as above, I'm always interested to see this thread updated.
So, I had a quandary to post, but I've found my own answer...!
Back in issue 2, you received a translucent EM field projector (see bottom item in image below). However, since then, all the other parts are a solid colour (see top image).


I was going to post but found the answer here: https://myenterprised.com/build/stages-1-10/stage-2/
So - discard the translucent one, use the solid colour ones!
I'll post updates soon. I'm a fair bit behind (in the middle of Stage 54 - busy dad syndrome!) but photos to follow.
Having found the above site, I see there's a guy who's had similar issues to me (bits of screws or housings press against the framework and make things sit awkwardly sometimes) so I'm going to go back and read his notes.
Back in issue 2, you received a translucent EM field projector (see bottom item in image below). However, since then, all the other parts are a solid colour (see top image).

I was going to post but found the answer here: https://myenterprised.com/build/stages-1-10/stage-2/
So - discard the translucent one, use the solid colour ones!
I'll post updates soon. I'm a fair bit behind (in the middle of Stage 54 - busy dad syndrome!) but photos to follow.
Having found the above site, I see there's a guy who's had similar issues to me (bits of screws or housings press against the framework and make things sit awkwardly sometimes) so I'm going to go back and read his notes.
I'm priced out of this (and I suppose I don't really have space) but I am really enjoying living vicariously through you guys who can (and who have waaaay more model building skills than I have!). Please continue
I have added some more of the underside saucer panels.
Something really important to mention here, there are two holes on the attachment of the saucer rim panel, these are used to secure the the panel in to place with two small metal lugs. I did not notice that one of the holes was not drilled all the way through, so when I tried to screw it in to place the panel was not in place correctly as a lug could not sit in a mission hole. One the screws snapped as the angle was off. I removed the panel and used a screw driver to complete the missing hole in the piece so that the piece could sit correctly. I did not take a picture of this but I shall illustrate with a previous picture of a panel piece which is the same so that you know which holes to check for, making sure that they are drilled correctly:
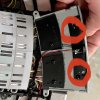
The two small grey dots are where the lugs hold the panel in place. The top hole in this picture was missing from my latest panel piece.
Other than that small problem, here is the completed paneling in place:
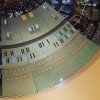
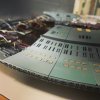
As you can see, the alignment at the saucer rim between panels is not perfect, but this is barely noticeable. There is also a small but notable bit of light leak on the rim connection/join which I fixed with black insulation tape. Also another light leak between the new panel and the previous ones which should be removed when the panels tighten together hopefully.
Don’t go building this model expecting it to be easy or perfect by the way…. It definitely takes a lot of patience and hard work. I am very happy with my model so far though it has a few design flaws/small manufacturing mistakes which can be worked out.
Something really important to mention here, there are two holes on the attachment of the saucer rim panel, these are used to secure the the panel in to place with two small metal lugs. I did not notice that one of the holes was not drilled all the way through, so when I tried to screw it in to place the panel was not in place correctly as a lug could not sit in a mission hole. One the screws snapped as the angle was off. I removed the panel and used a screw driver to complete the missing hole in the piece so that the piece could sit correctly. I did not take a picture of this but I shall illustrate with a previous picture of a panel piece which is the same so that you know which holes to check for, making sure that they are drilled correctly:

The two small grey dots are where the lugs hold the panel in place. The top hole in this picture was missing from my latest panel piece.
Other than that small problem, here is the completed paneling in place:


As you can see, the alignment at the saucer rim between panels is not perfect, but this is barely noticeable. There is also a small but notable bit of light leak on the rim connection/join which I fixed with black insulation tape. Also another light leak between the new panel and the previous ones which should be removed when the panels tighten together hopefully.
Don’t go building this model expecting it to be easy or perfect by the way…. It definitely takes a lot of patience and hard work. I am very happy with my model so far though it has a few design flaws/small manufacturing mistakes which can be worked out.

I have added some more of the underside saucer panels.
Something really important to mention here, there are two holes on the attachment of the saucer rim panel, these are used to secure the the panel in to place with two small metal lugs. I did not notice that one of the holes was not drilled all the way through, so when I tried to screw it in to place the panel was not in place correctly as a lug could not sit in a mission hole. One the screws snapped as the angle was off. I removed the panel and used a screw driver to complete the missing hole in the piece so that the piece could sit correctly. I did not take a picture of this but I shall illustrate with a previous picture of a panel piece which is the same so that you know which holes to check for, making sure that they are drilled correctly:
View attachment 27050
The two small grey dots are where the lugs hold the panel in place. The top hole in this picture was missing from my latest panel piece.
Other than that small problem, here is the completed paneling in place:
View attachment 27051
View attachment 27052
As you can see, the alignment at the saucer rim between panels is not perfect, but this is barely noticeable. There is also a small but notable bit of light leak on the rim connection/join which I fixed with black insulation tape. Also another light leak between the new panel and the previous ones which should be removed when the panels tighten together hopefully.
Don’t go building this model expecting it to be easy or perfect by the way…. It definitely takes a lot of patience and hard work. I am very happy with my model so far though it has a few design flaws/small manufacturing mistakes which can be worked out.
Looks really good. I'm okay with a few imperfections because as a non-modeler I would always assume that I would get something a little wrong when building a model. Overall, I think the way the model is engineered is quite good. I do still wonder though how they want to make the thing stand up, what with the heavy saucer and all.
I think it looks great and the (slight) gaps between panels add to the verisimilitude of the model. Most likely, as you pointed out, by the end of it you’ll have a model that looks better than the filming model actually used on the show.
Just curious, as it’s a partwork, when is the final part due to be delivered? Is it mere months away or next year or what?
Just curious, as it’s a partwork, when is the final part due to be delivered? Is it mere months away or next year or what?
I think it looks great and the (slight) gaps between panels add to the verisimilitude of the model. Most likely, as you pointed out, by the end of it you’ll have a model that looks better than the filming model actually used on the show.
Just curious, as it’s a partwork, when is the final part due to be delivered? Is it mere months away or next year or what?
The project comes in 30 monthly shipments, so it takes a while. I believe those who started early are on their 16th, 17th shipment or so. Me, I started a bit late and just got my 10th. Timofnine is much further along.
I reiterate the need for keeping spare FM screws as they pretty much always (so far) resolve the problem of screws which become thread bare due to over tightening. I guess this would work with other size screws that become thread bare… use the size up instead? But FM always saves the day. 

I haven't posted lately as I've been stressed with work and I caught covid. I'm looking into making the windows with resin and researching various methods of doing them. Once I've done some more work I will definitely be posting pics 

Similar threads
- Replies
- 5
- Views
- 12K
- Replies
- 2
- Views
- 297
- Replies
- 7
- Views
- 3K
If you are not already a member then please register an account and join in the discussion!

