Years.
-
Welcome! The TrekBBS is the number one place to chat about Star Trek with like-minded fans.
If you are not already a member then please register an account and join in the discussion!
You are using an out of date browser. It may not display this or other websites correctly.
You should upgrade or use an alternative browser.
You should upgrade or use an alternative browser.
Building the Eaglemoss Enterprise-D partwork
- Thread starter Leathco
- Start date
Well considering some people have been waiting months for shipments a few weeks is pretty quick.
Have these people had emails confirming their shipments have left the warehouse?
I got a shipment notification yesterday. I’ll see how long the actual delivery time takes…Nearly two weeks since my last shipment confirmation email and nothing to show for it. Apparently moving to a UK warehouse was going to make things quicker. Lol, good one.
I’m going to do some more work on the model tomorrow which should have me as up to date as I possibly can be until the next delivery, so I will post some progress pictures and let people know if I run in to any more problems.

I’m also kind of ok with the blacked out windows in the star drive section now, in this reference studio model screen shot there appears to be quite a few blacked out windows anyway so maybe it is accurate.

**EDIT**
It looks like I will have to dismantle the under side of the saucer section.
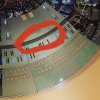
This lip/join is supposed to sit flush with the ventral phaser array, like the panel on it’s left. I’m glad that I spotted this now and not further down the line when I have a lot more panels attached.
I will also attempt to correct this, and post pictures of the difference to panel alignment that the correction makes.

I think that I could leave this as it is, but I want to make the model as perfect as possible.
Last edited:
I got a shipment notification yesterday. I’ll see how long the actual delivery time takes…
I’m going to do some more work on the model tomorrow which should have me as up to date as I possibly can be until the next delivery, so I will post some progress pictures and let people know if I run in to any more problems.
I’m also kind of ok with the blacked out windows in the star drive section now, in this reference studio model screen shot there appears to be quite a few blacked out windows anyway so maybe it is accurate.
View attachment 27212
**EDIT**
It looks like I will have to dismantle the under side of the saucer section.
View attachment 27213
This lip/join is supposed to sit flush with the ventral phaser array, like the panel on it’s left. I’m glad that I spotted this now and not further down the line when I have a lot more panels attached.
I will also attempt to correct this, and post pictures of the difference to panel alignment that the correction makes.
I think that I could leave this as it is, but I want to make the model as perfect as possible.
In Maine, that's what we call a frost heave.
Bless your patience with this project. I couldn't do it.
Can't wait to see the finished ship!
I got a shipment notification yesterday. I’ll see how long the actual delivery time takes…
I’m going to do some more work on the model tomorrow which should have me as up to date as I possibly can be until the next delivery, so I will post some progress pictures and let people know if I run in to any more problems.
I’m also kind of ok with the blacked out windows in the star drive section now, in this reference studio model screen shot there appears to be quite a few blacked out windows anyway so maybe it is accurate.
View attachment 27212
**EDIT**
It looks like I will have to dismantle the under side of the saucer section.
View attachment 27213
This lip/join is supposed to sit flush with the ventral phaser array, like the panel on it’s left. I’m glad that I spotted this now and not further down the line when I have a lot more panels attached.
I will also attempt to correct this, and post pictures of the difference to panel alignment that the correction makes.
I think that I could leave this as it is, but I want to make the model as perfect as possible.
This is by no means a comment on your skills but damn those panels look so misaligned
 .
.This is by no means a comment on your skills but damn those panels look so misaligned.
I have no skills for this kind of thing unfortunately, I’m just doing my best with what is to me a sometimes *very* difficult project to put together. I have never had any urge to build any other model kit like this… the only reason that I am building this one is because I love Star Trek and the USS Enterprise D was my imaginations playground when I was kid. I’ve always wanted a replica of this standard and detail so it’s like a childhood dream to build something like this.
I don’t think that I will ever get it perfect, but I will certainly do my best to! Hence why I am going to dismantle the lateral saucer deck panels to try and get better alignment.
Wish me luck!
I'm in the same situation as you. I love the enterprise d. seeing it for real at this sort of size really has got me excited. I just wish eaglemoss has put more thought into the design.
Well the studio model itself wasn’t perfect if you look at stock images. I’ll be happy regardless, it’s better than what I built as a kid out of plastic and badly painted haha!I'm in the same situation as you. I love the enterprise d. seeing it for real at this sort of size really has got me excited. I just wish eaglemoss has put more thought into the design.
Good luck!
Well the studio model itself wasn’t perfect if you look at stock images. I’ll be happy regardless, it’s better than what I built as a kid out of plastic and badly painted haha!
My thoughts exactly. I treat my build the same way. Eaglemoss has by the way been very active recently. In the last four weeks, I got three shipments. Probably has to do with them moving storage facilities as they announced. Have you other builders gotten as many too? I thought they would only do a one-time double shipment, not three in a row.
Well I have fixed the panel alignment for my ventral saucer panels. Here is a summary of things to remember when you panel the underside of the saucer.
First of all, the problem was caused by me screwing the window reflector panels on underneath the mid panel too tight, so the upper panel could not slide under it. I have illustrated the screws which were too tight below:
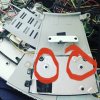
once these screws are slightly loosened, make sure that the windows are still in tight, and then slide the upper panel underneath, it is easy to slide under now that it is not so tight:
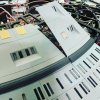
You can see two panels side by side above.the panel where the phaser array rests neatly with the window panel is how the join should be between the panels:
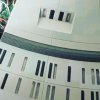
As you can see, this adjustment makes a MASSIVE difference to the panel alignment aesthetics.
There is now as near perfect )as possible for my limited abilities) join between the saucer edge window panels and the phaser array. I will make sure that I follow this procedure for the remaining panels!
Of course, the panels will all pull in together tighter as the centre piece of the underside of the saucer is tightened in to place. The top of the saucer tightened up in a similar way.
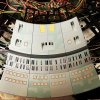
It was easier to resolve then I thought actually.
*EDIT*
Almost zero light leak now too!
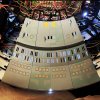
First of all, the problem was caused by me screwing the window reflector panels on underneath the mid panel too tight, so the upper panel could not slide under it. I have illustrated the screws which were too tight below:

once these screws are slightly loosened, make sure that the windows are still in tight, and then slide the upper panel underneath, it is easy to slide under now that it is not so tight:

You can see two panels side by side above.the panel where the phaser array rests neatly with the window panel is how the join should be between the panels:

As you can see, this adjustment makes a MASSIVE difference to the panel alignment aesthetics.
There is now as near perfect )as possible for my limited abilities) join between the saucer edge window panels and the phaser array. I will make sure that I follow this procedure for the remaining panels!
Of course, the panels will all pull in together tighter as the centre piece of the underside of the saucer is tightened in to place. The top of the saucer tightened up in a similar way.

It was easier to resolve then I thought actually.

*EDIT*
Almost zero light leak now too!

Last edited:
A bit of an update.
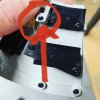
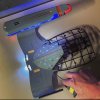
reflector panel 72I needs a tiny bit of it’s corner cutting or filing away so that the panel fits properly in the skeletal frame:
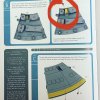
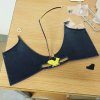
The rear navigation lights on the secondary hull rear need a bit of tape to hold them in place whilst the panels are positioned:
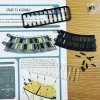
And for those who want to know how painstaking it is putting in all of the individual windows…
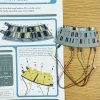
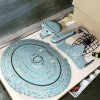
Finally, latest progress pictures…
reflector panel 72I needs a tiny bit of it’s corner cutting or filing away so that the panel fits properly in the skeletal frame:


The rear navigation lights on the secondary hull rear need a bit of tape to hold them in place whilst the panels are positioned:

And for those who want to know how painstaking it is putting in all of the individual windows…


Finally, latest progress pictures…


Last edited:
I presume one will easily be able to access the battery box once the model is completed. It is a large presumption, certainly, but one made with sincerest hope.
A meticulous project, for sure. Bless your patience!
Looking good! I like the keel on the stardrive section.
A meticulous project, for sure. Bless your patience!
Looking good! I like the keel on the stardrive section.
Battery boxes are sealed with magnetic sealed deck panels (the battle bridge lifts off in the same way too). I’ll take a picture next week when I’m back in work to show how the battery boxes are concealed within the model.I presume one will easily be able to access the battery box once the model is completed. It is a large presumption, certainly, but one made with sincerest hope.
A meticulous project, for sure. Bless your patience!
Looking good! I like the keel on the stardrive section.

*EDIT*
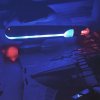
And one pic I found testing the lights again…
Last edited:
Thanks for the pictures of the windows! That’s exactly how I thought they’d be. They look fiddly, but the kind of fiddly that’s very fun to me!
Thanks for the pictures of the windows! That’s exactly how I thought they’d be. They look fiddly, but the kind of fiddly that’s very fun to me!
It's surprisingly fun actually - if you use tweezers, which I didn't for the first few stages. Without, I found it annoying, but with the tool, it's quick and painless and kinda meditative.
It's surprisingly fun actually - if you use tweezers, which I didn't for the first few stages. Without, I found it annoying, but with the tool, it's quick and painless and kinda meditative.
Meditative indeed. I’ve been building Warhammer models for 30 years and while it’s not the same, it’s comparable. I love this kind of stuff. Tiny windows on sprues. Brilliant.
I just noticed it’s lacking a registry… do they provide decals for that?
Similar threads
- Replies
- 5
- Views
- 12K
- Replies
- 2
- Views
- 308
- Replies
- 7
- Views
- 3K
If you are not already a member then please register an account and join in the discussion!


