• Welcome! The TrekBBS is the number one place to chat about Star Trek with like-minded fans.
    If you are not already a member then please register an account and join in the discussion!

9 PDF

Thanks guys. It means a lot. Today I have created a new folder on my desktop for outer bridge ring reference copying from the bridge pics folder. This is going to take a while since I have to sort through 3100+ image files in that folder and then add what little studio line art there is. The new folder should be fully assembled by Saturday.

The standards I mentioned about the no lying and showing respect for others is some thing the wolves in fandom will publicly agree on with the sheep out of fear of loss of public image and lost opportunity to hose others. The real moment of truth is when no one is looking and in private do they agree with it and can or will "can" any personal ambition against others seeking to help them and not hurt them. It all boils down to greed, lack of respect for others and a willingness to lie and deceive and each of us making the clear commitment in advance to not entertain all that and give in to it and show restrain over arrogance. How people act on this in private is the real test and not just out in the open.

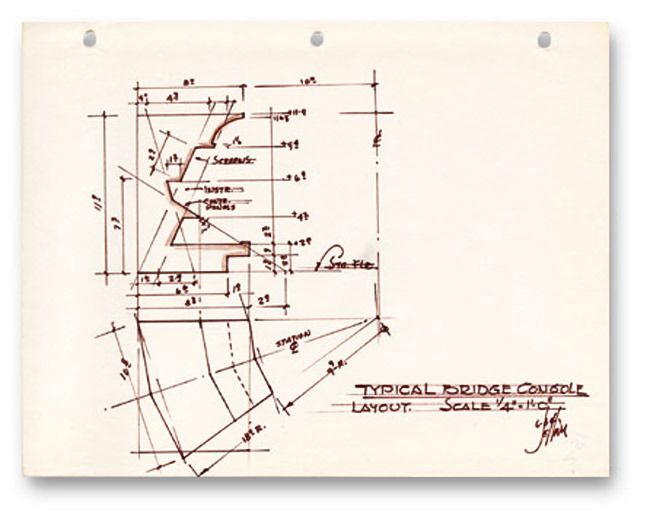
I think I may be to the point to where I am toying with the idea to post some early drafting samples I did of the transporter room before changing the format from 8 1/2 x 11 to 11 x 17. Just to give you guys an idea of what the finished product visually alongside photos of the model will look like and what to expect. None of the measurements will change and are locked in, only the page size is doubled so I won't have to divide larger templates for beams, etc between two pages. On that note I just raised the subject with the wife about getting a 11 x 17 scanner just for this project's new page format. So far she seems open as long as I actually use it. Funny when we got her scanner printer and installed it's drivers on my MacBook Pro it negated the drivers on my old scanner printer. That's at present in the new setup in the garage I have my old computer and scanner to bypass that problem. For now money to act on that is the issue. But since it still is a little way off time wise till I get everything finished with the physical total stage plan and locked in before I'll be at the point to buy one. So for now I have some breathing room till then.
 
Last edited:
The main reason why I am also thinking about posting the earlier "blueprints" I did s so if anyone is wanting to do a test CGI modeling of what I am posting. Kind of a early CGI dry run sourcing from the drawings to see if everything size and dimension looks right. But I would feel better if someone does CGI the samples here that they first turn off that first person shooter fish eye gaming perspective so to see how it looks as real world and not first person shoot me up perspective. As well I am concerned about how to best serve up the drawing to make it as easy as possible to work from either real physical build or CGI. Some feedback and suggestions on that would be welcome. A clay model will suffice with the results posted here. Bill Thomas are you game?

EDIT: This exercise is not limited to one person. Anyone can participate. In fact I think I would like to see as many people model this just to see how smooth the process is for everyone in their feedback and posted pics here. Think of it as a pre release dry run. If people express interest in this I'll post those drawings here this evening.
 
Last edited:
I'm not sure how quickly I could complete it, but I'd be willing to take a crack at a model of the transporter room from your preliminary BP. I don't use a gaming renderer, and can build real-world scale with conventional camera focal lengths.

I've been wanting to do some interior modeling anyway and have been waiting to base my efforts on your research rather than winging it on my own.

Now if I could just remember what I did with the manufacturer's schematic of that black perforated trim they use all over the place....

M.
 
Ive got the template for the filmstrip trim already worked out but not blueprinted. I'm about to crash tonight so I'll post the pages tomorrow after I get home from work tomorrow night.
 
Well here they are incomplete they may be....

Everything is marked off in one inch grids. ( 1 inch equals 1 foot )


What I had drawn previously was only the core of the transporter chamber. Due to disagreements with some local people who wanted to used my plans they kept changing them thus I ground to a standstill and walked away to preserve my timetable and avoid conflict demanding constant revisions. That is what made me decide to not to waste time and effort, and instead wait till physically everything is built and then blueprint from the model so I will avoid wasting time doing revisions. This is how I intend to blueprint everything form now on only once from the model and no revisions. The only changes to the blueprints will be when I go back and add more detail. Much simpler and less hassle for me.

EDIT: IT seems I forgot to include the page with the ceiling spoke beams the hanging light bells are mounted to. I'll post that page tomorrow. ( long day )

page 1 Deck Platform

LnEUplx.jpg


page 2 Underside

y4P04Xv.jpg


page 3 Deck Platform

fKipS76.jpg


Page 4 Underside

M3PT5ZG.jpg


Page 05 Left side curved wall platforms

WHQVMVq.jpg


Page 06 Curved wall left side
( note this page will be revised to include 4x4 verticle beams to mount ceiling and awning trusses to. )

2ToXnWy.jpg


Page 07 Zebra panels

yPFyTpC.jpg


Page 08 Light diffusers Deck Support

NT7vWWz.jpg


Page 09 Fresnell / Light Supports

CPf4RDK.jpg


Page 10 Deck Skirt

RJQzWom.jpg


Page 11 Upper Steps

wQ4LLRC.jpg


Page 12 Lower Steps

4rzvfcI.jpg


Pages 13 thru 17 took with camera due to scanner drivers need to be updated on wife's scanner. ( Have yet to reinstall the old drivers for my old set up/ )

Page 13 Chamber ceiling hub mount above hub hex block.

tAoHcUV.jpg


Page 14 Awning

pX3wDs2.jpg


Page 15 Ceiling wedge

QYcSxYT.jpg


Page 16 Filmstrip Trim and ceiling hub spoke mount ( cut from 4x4 beams block / load bearing ) ( Special Note: Filmstrip template is 3 inches by 12 inches. This steps and repeats the whole 8 feet from floor to ceiling of transporter chamber. Note after each step and repeat flip template front to back between each step since outer pattern alternates. )

HQ42Fhb.jpg


Page 17 Ceiling truss chamber center

6EmVYqh.jpg
 
Last edited:
I checked through the transporter room template folder and could not find the spokes page. I have to clean up some of the clutter upstairs and hopefully it will show up. If not I'll redraw it. Just in case the spokes are 5/8 inch wide, 6 inches tall, and 7 feet long and cut just inside where the end meets the inside skin of the awning.
 
Last edited:
This morning I made a request of Tony who works with me about authoring some various 11x17 multiple page PDFs to get a feel on balancing scan and out put resolution verses final file size. He should have his test files done by the end of next week. I've been concerned about verifying every step as we proceed into the authoring web authoring phase of this project. He will ultimately provide high resution output files higher quality to keep on hand. But my main goal is to maximize quality while keeping the file sizes as low as possible without sacrificing image quality. When I review the test files I then can calulate up and crudely predict what the final output file sizes will be for 9 PDF to be released publicly.
 
Saturday got much done. Sifted through all the pics of the outer ring and acetate scratch traced which ones had the best profile of the outer ring console. Have enough to have redundancy in multiple traces to ensure accuracy to build a composite profile from the traces that I can confidently trust. ( and using the vertical edge of the turbo lift foyer to establish true vertical with it bisecting the console profile. ) Started to draw it up and proceeded to the next step in verifying ceiling heights of the turbo lift foyer and the outer bridge ring. Decided to use known actor heights in long shots of the outer ring to establish height. Problem to consider...are actor heights listed on google with or without shoes cause the difference is average 1 inch average on the male actors. Measuring the actors in those stills consistently suggests a taller bridge of a few inches which would be outside the margin of error of the shoe heel heights. I'm just wanting to lock down if actor heights are rendered with or without shoes. If Nichelle Nichols is listed at 5 ft 5 inches I would think it would be without those tall heel boots she is wearing. ( because of this I am excluding her in measuring actors in the outer ring long shots. ) When this is nailed down to accurately measure height then I can scale the profile traces of the outer consoles in the drawing. ( there is a 2 inch drop in the turbo lift ceiling due to overhead screen.

Edit: we know to a degree actors will try to list themselves taller in increase their chances to be cast so it can be assumed shoe heel height is factored into their height. The average heel on a shoes is 1 inch with I am approximating 2 inches on those hot heels they wore in the TOS series. So a possible adjustment of 1 inch down to reflect true actor heights minus the taller heel in the series. If listed actor heights can be accepted at face value then I can off the batt trust the early results I am getting from measuring the actors to ceiling in the outer ring bridge stills. The early results suggest a bridge that is 4 inches taller than McMaster. And this is allowing a 1 inch margin of error for any additional shoe heel elevation that would throw the measurements I am doing. Logic is the 4 additional inches in bridge height is greater than a 1 inch heel adjustment in the measurements to be well outside the margin of error to be trusted. The reason this is significant is that the McMaster upper moniter display frames above the consoles are more squat and horizontally rectangular than what is seen in TOS stills which appear taller.That points to a taller ceiling or a shallower bridge center radius on the placement of the outer ring consoles. Based off the two know surviving printed overhead drawings seen in numerous books of the bridge which agree with each other I am ruling out the radius question for the outer ring con olds from bridge center.

But before jumping in on a taller bridge I'd like to check all the known stills of the actors in full body long shots seen on the outer ring. ( excluding the shots where they are not standing erect and not slouching. ) So far I have about 70 stills to check on this and have only measured 5. So this is going to take some time to see which measurement dominates. But 7 ft 6 inches seems to be emerging verses McMaster's 7 ft 2 inches.
 
Last edited:
Here is the process if anyone wishes to help with doing this step of the measurements....

1. Display long shot still of actor on moniter.
2. Zoom 1 step and rotate moniter if actor from foot to ceiling cannot be fully viewed.
3. Take a strip of cardstock and mark where the center of actor's foot intersects the floor.
4. Mark on cardstock the top of actor's head.
5. Mark botom of ceiling above actor.
6. Using a printers pica pole point measuring system ( or other fine minute measuring device ) measure the length on the distance on the actor from head to foot to determine his point measurement.
7. Divide that number by the actor's total height to find point values for each inch value.
8. Multiply up the point values to arrive at 1, 2, 3, 4, 5, 6, 7, 8 foot, and 3 inch and 6 inch point values.
9. Build a ruler in cardstock to arrive at the foot measurements in point values.
10. Once ruler is completed check measurements to validate a tor's height.
11. Once actor's height is verified on new cardstock ruler measure failing from actor's foot where it meets the floor.
12 record and mark on ruler with an arrow and the final result for that photos to establish ceiling height.

WARNING: This process is only reliable in long shots from a distance from across the bridge to minimize distortion from camera center in the shot.
13. After looking at all the measured photos which measurement consistently dominates in the results. That will be the arrived at ceiling measurement.
14. Record file name of still to reference shot. ( trek core file names would be best universal reference between people doing this.
 
As someone who long ago tackled a FAR simpler work of physical draughtsmanship, I'm awestruck at the work (research and construction), and insufferably pleased at Mr. Simmons' demonstration of the efficacy of "stones knives and bearskins."

David Winfrey
 
As someone who long ago tackled a FAR simpler work of physical draughtsmanship, I'm awestruck at the work (research and construction), and insufferably pleased at Mr. Simmons' demonstration of the efficacy of "stones knives and bearskins."

David Winfrey

Thank you. ( humbled ) I aim to please. I've heard about your shuttlecraft plans. Been looking to as well for 9 PDF build and blueprint the shuttle exterior and interior sets as well as auxiliary control, and the mini corridor.
 
Progress update: Been working on the outer ring profile and am very pleased with the results. Everything right off the bat hit on the money when cross checking their alignment points against TOS bridge stills. Quite a radically different creature than the McMaster profile. And I'm not just talking the upper curve above the ceiling. All the heavy investment in research and measuring made for a easy assembly of the profile. Still need to do a final measurement cross checks before locking it in and doing a final drawing. I am planning a red and blue of this work and McMaster on top of each other to delineate the differences to make them more obvious. Setting that aside for now. Today's goal is the upper display monitor frames above the consoles and mapping their faces. Hopefully that will be done before this evening.

I've made a decision to refrain from posting the drawings until when the bridge is officially released publicly. This is to prevent anybody ripping it off and claiming it as their own, charging money for it, etc. I would like the credit for the research and work. But am trying to steer a path that safeguards fans being ripped off by the unscrupulous wolves out there. So proof will be in the form of the finalized model with it's photos posted here. With the information I should have this evening I'll have all the necessary info to begin building the finalized bridge model. Well...at least the outer ring consoles from floor to the curved dome up top. After that the next goal is to begin research on the main viewscreen.
 
Thank you Mytran.

Update: Made a decision to redo the order of releases for 9 PDF pushing the bridge to the front of the list and going live with official releases as of Today. This is Release 1.0 Bridge Outer ring profile. Today I pretty much finalized the profile for the outer ring consoles since beginning researching it April 12th post. Decided to officially release it today. Since I don't have a working scanner I'll have my friend at work scan it in for me and I will post it here. For now I can at least preview it for all of you with my camera phone. This is the end result of sifting through 3100 plus bridge images repeatedly to flesh out each detail and to dismantle what appear to be irregularities due to camera angle and elevation. I've been using acetate traces to build this which was not hard due to getting elevations and angles and it all fell into place after putting each line on a protractor on onionskin to lay them in position. I'll have more detailed cleaned up drawing later on. This is just to get the critical information from the study out there to anyone who wants to build sets or CGI from it. I'll be finishing up the outer ring overhead monitor frames next then on to the viewscreen which MGagen and I have been having some private discussions on.

This is what I have been spending the past month on building piece by piece.

GLcfiVV.jpg


This is the clean up. Deck elevation was checked and found to be accurate observing the 6 inch step rule. ( Checked against Kirk and McCoy standing in the bridge well next to the deck. Both actors are listed at 5 ft 10 inches which was what I built the rulers off of. Having more than one actor to check against helped to cross check. )

jK3Xr89.jpg


And for comparison a phone pic of my McMaster printout profile.

 
Last edited:
Great work, thanks for the early release!

Interesting that you have discovered the true starting radius of the upper platform as 9'3", because in the (hitherto) only elevation plan available, it's marked as 9'9"

jefferies_bridge_cross_zpscnyamckn.jpg~original


Why the change, I wonder? Best guess would be that it makes measurements easier for the carpenters to build the wedges, since they would use inches rather than angles or degrees.

It's also fascinating to see the original angles of some of the consoles compared to the final results
 
The radius of 9 ft 3 inches came from the Steve Sardanis sheet from Journey to Babel. McMaster has that measurement at 9 ft 4 inches. I decided to let the studio drawings be the final authority. But when I checked measurements of the bridge overhead printed in MoST it was in disagreement with the bridge drawing on the various stage 9 drawings. Since the Journey to Babel sheet has more detail that the two Marshall sheets, and since all 3 of those agree on size and angles I went with that being the official studio drawings. The full stage 9 drawing in MoST I measured too after blowing it up to a 2x3 ft printout.
 
I see, thanks! :)

I'll post pics with the rulers. My baseline for building the rulers for the bridge was the helm which the auction site said was "approximately 78 inches." When building the rulers for the entire stage 9 plans the 8 foot wide corridors width matches the measurements on the bridge with those rulers. So agreement between the two I view as validating the measurement of the helm. ( the only way to be rock solid certain is to get access to the helm itself and do meticulous measurements to verify that. ) It was with rulers based off that helm measurement that the 9ft 3in measurement comes from.
 
If you are not already a member then please register an account and join in the discussion!

Sign up / Register


Back
Top