• Welcome! The TrekBBS is the number one place to chat about Star Trek with like-minded fans.
    If you are not already a member then please register an account and join in the discussion!

Fan Filmmaker's Primer

I don't know how many of you will find this interesting, but tomorrow (Friday May 25th) I'm going to be doing a short pickup shoot for a short film. For those who are curious about the process, I think I'd share some of the emails and our Call Sheet as a reference. I'm gonna SPOILER CODE the bulk of this message for those who aren't so interested in how sausage is made.

Discussing requirements with the stage owner:
Vic:

As per your request, I am ccing you on all correspondence with Benoit from here forward. He and I have discussed the schedule and technical needs. Please have a look below.

EQUIPMENT

  • 8X8 green
    • 12X as backup if 8X8 is insufficient (let us know if this is available)
  • (3) Kinos
  • (3) parabeams
  • HD monitor
QUESTIONS

  1. Have you had had shoots this week which have left the studio prepped for sound and the stage clear?
  2. Will you or your Intern be IN? If not, shall I handle all ins and outs and space distribution?
  3. Can we use the downstairs bathroom to do makeup and hair?
  4. Can we make use of the 2 spaces at Little Giant's Lot? If yes, do you have directions and parking maps?
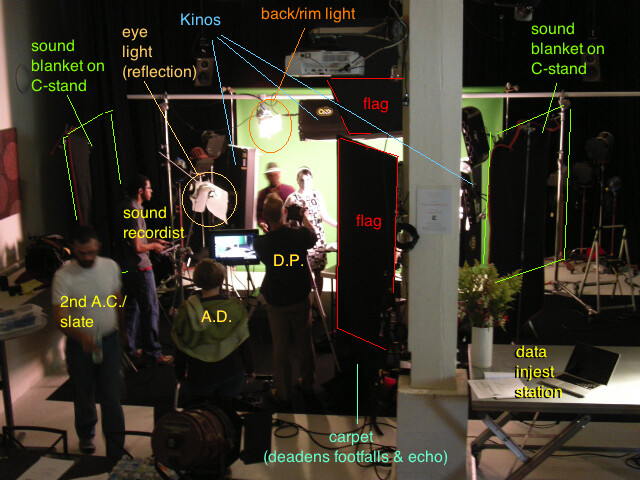
CREW
Going to a minimal crew here so as to allow us to get in and out fast.
CALL SHEET is live HERE, and will be updated as needed:
https://docs.google.com/spreadsheet/ccc?key=0Aowrri1Um4ttdHNFaVROYzIyd2tfNDMwMDRJUU1reVE


SCHEDULE
We'd like propose the following schedule:

  • 8 am : Benoit
  • 8.30 am : Maurice & Becky (Becky will let people in and out, etc. she'll also play script supe)
  • 9 am: Richard (set dressing & props), Rachel (makeup), Heather (actress)
  • 9:45 Sound, 2nd actor (off-camera)
  • 10 am first shot
  • 12:30 pm Wrap
  • 1 pm OUT

CRAFT SERVICES = NONE
Folks bring their own coffee/water bottle so we don't have to stray in any non-stage areas except for downstairs bathroom. No snacks.


NOTES ON THE SHOOT
Setups
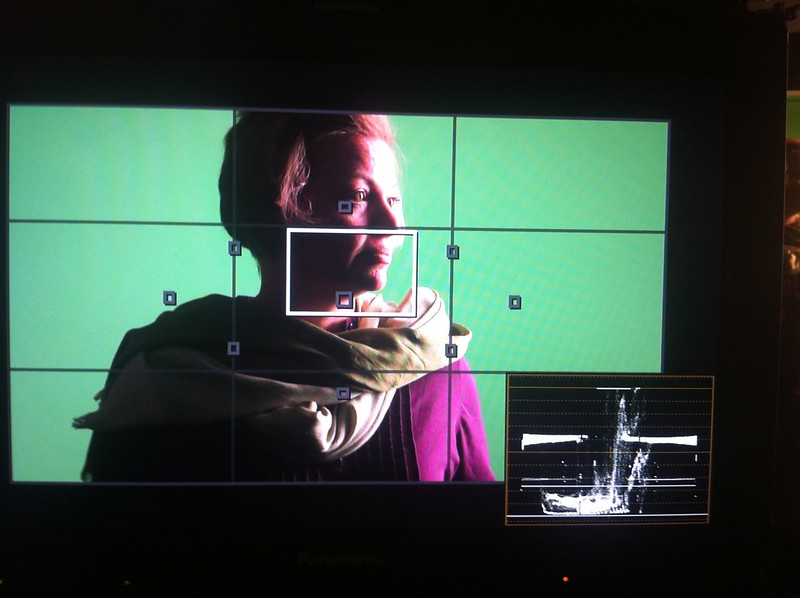
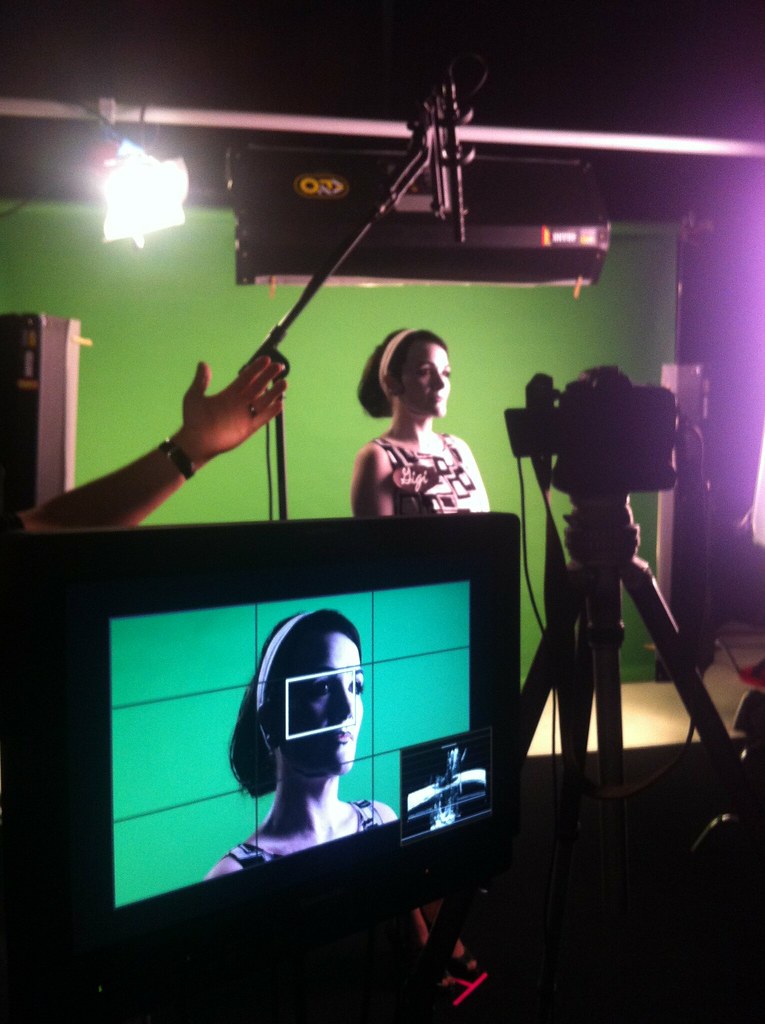
The character never moves from her spot behind the bar. As such, we should require only one lighting setup
We'll run the dialog in both closeups and medium closeups, and we might do a waist-up medium shot in one instance
2nd Actor
Required for eyelines and to have someone for Heather to play off
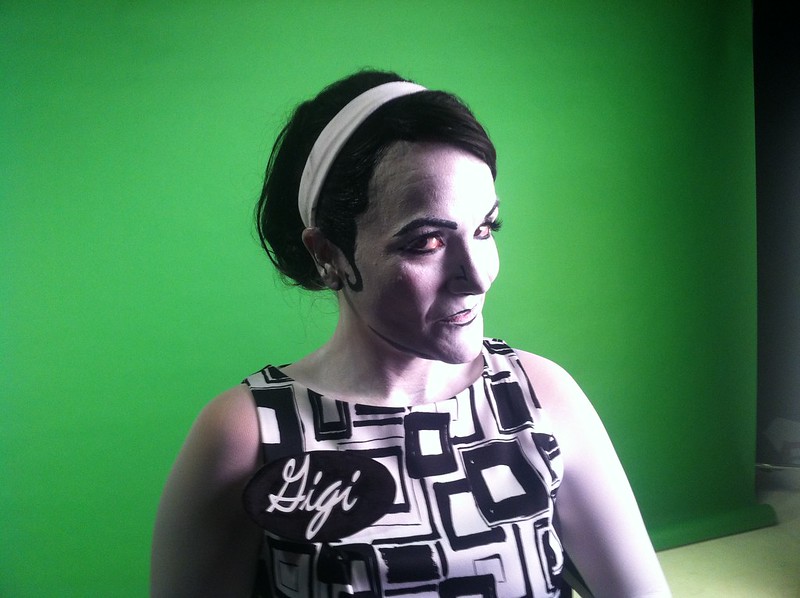
Makeup
We need a dedicated makeup person due to the complicated makeup and costume. Actress cannot do her own.
The actress can leave in makeup if that's more expedient, so the makeup person can reset the bathroom to One while we are shooting.
Trash
We pack out anything we bring in

Thanks again.
A follow-up regarding how much "set dressing" we are doing. This shoot is on greenscreen, so...
Guys:

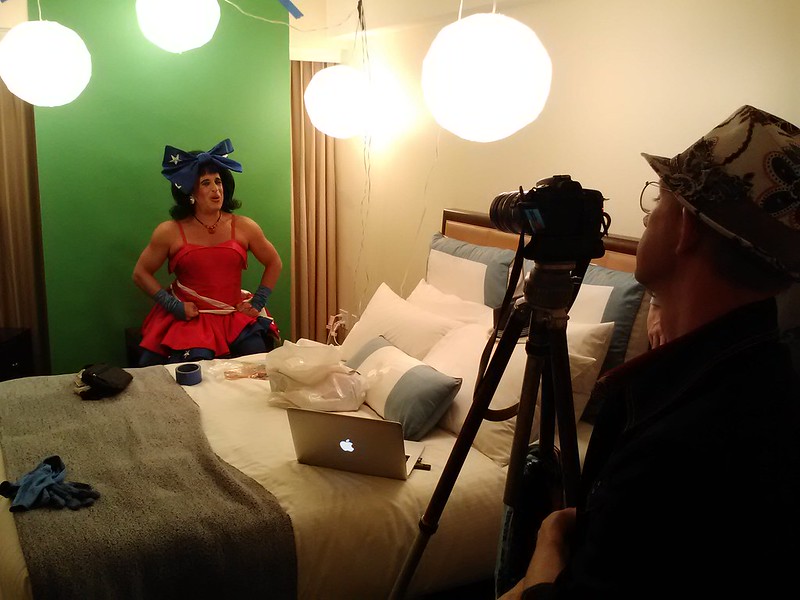
Re the "set": there is none, really. The only set piece is a 3' section of bartop, and that's only used for one shot. It's merely a piece of black foamcore with a white semicircle on it. I planned to just set it on one of the hi-tops for the one setup it's used it (she mimics pouring a drink and slides it across the bar).

I am bringing one additional P.A. in case we need him for anything on in the event that someone else can't make it, but I've already told him I'll dismiss him if it turns out he's not needed.

Benoit: I will have my laptop there and even if we don't log and transfer on-site I will at least copy the cards to the laptop hard-drive and import them later.

Gonna try something different with the props this time. I made the bottle hot pink instead of black and white, so that I can isolate the color of the bottle and keep it distinct from the actress when the footage gets processed down to flat.
Here's the email sent to cast and crew.
Hi everyone, and thanks for your patience:

SCHEDULE
First off, if you click the following link...
http://tinyurl.com/GigiPickup

...you will see out call sheet for tomorrow's shoot. As this is a Google Doc I can update it from anywhere and not have to remail it. Please have a look at it again before bedtime tonight and again first thing in the morning in case there are any last minute changes.

LOCATION
In case you don't remember, The Producer's Loft is here:
http://www.theproducersloft.com/directions

PARKING
Parking in that area is not terrible on weekdays but it IS restricted to 2 hours on many streets and 1 hour on others. The Producer's Loft has two off-street spaces we can use. I'll need one, as I'll be there from 8:30 through shutdown (and I'll be transporting Richard and Jim). I was thinking of giving the other space to Heather and Rachel. If anyone wants to BART over, that's great since the studio is only a few blocks from the 24th Street station. If anyone wants to drive to my neighborhood and leave their car out here, I can transport one additional person. I also have a P.A. who will have his car and could help shuttle anyone who needs it, or could move someone's car for them after 2 hours if necessary. What I don't want is to have someone critical need to run out to move their car during the middle of shooting, especially given our tight schedule.

For whoever ends up with the parking spaces, here's where they are:

DIRECTIONS & PARKING - LITTLE GIANT LIGHTING & GRIP SPACES #9 & #10 ONLY.
http://theproducersloft.com/parking/LittleGiantParking.html


CAVEATS
Because we have such limited time to setup and clean-up, we're not going to have the customary craft services on set. I will provide bottled water. If you want to bring anything to nibble on, do so, but I ask that any snacking be done on the patio and that you pack out your own trash and not put it in the Producer's Loft rubbish. What we bring in leaves with us.

WRAP LUNCHIE?
For those who can hang around a bit after the shoot I'd love to have a bit of wind-down time with you after we "reset to one". Let me know if you can hang around and maybe we can find a nibble and/or a beer someplace.

Thanks in advance for everything!
And, as per the email above, here's the CALL SHEET (link).
End of sausage making.
 
Thanks for posting! That will definitely aide me as I ramp up to shooting. Much more professional and easy to wade through than my usual ramblings!
 
Thanks for posting! That will definitely aide me as I ramp up to shooting. Much more professional and easy to wade through than my usual ramblings!
Thanks. I hope things I post here are useful to people, so it's good to know when they are.

Speaking of the shoot referenced in those "sausage making" emails, we successfully wrapped our pickup and got all the shots on the "must have" list and "reset to one" the stage at the agreed-upon time. Whew!

Here are a few pictures I snapped before we rolled (I insist that all cell phones be OFF during shooting, so no pix were taken with phones while we were rolling).

7270901634_bda398fc1f_c.jpg

Lighting check

Here my A.D. stands in for the actress (still in makeup) while we set the lights. If you've never worked with a professional monitor, the box to the lower right displays a histogram which allows us to see how even the lighting on the greenscreen is. You can see the "hole" in the middle of the histogram where the stand-in is and the light values are lower.

7270901344_d28f13b863_c.jpg
"Mr. DeMolyneaux, I'm ready for my closeup!"
Actress Heather Sherpardson in full makeup takes a moment in one of the director's chairs in front of the greenscreen before we do final checks. The strange makeup is because the film we're making is literally a black and white comic book, and every piece of scenery is a drawing.
7270901052_7da26fd778_b.jpg

Quiet on set! Sound check! Eye-light!
Finally, here we are moments from the first take. There are a few things happening here. First, Sound Recordist Phillip Foster is checking levels as Heather runs some lines. Notice the hot pink "T" of tape that is the actor's "mark" on the floor.

The hand you're seeing to the left is being used to help aim a tiny light that isn't for illumination but to try to get a "glint" off the actress's eye when she turns into shadow. The light is barn-doored down to almost a point, and focused on the hand, which is slowly moved towards the actress while the grip adjusts the light to follow (otherwise, it's hard to figure out where it's pointing).

About the lighting:
  • The flat black boxes at the top center and left and right are Kino Flo 4-bank florescent light boxes—each with four tubes—that are the light used to illuminate the screen.
  • The diffused light to the upper left is stage lamp used to backlight/rimlight the hair and shoulder to camera left.
  • The big glow to the right are two Parabeam 400 light boxes (one above the other) shining through a large piece of diffusion and supply the primary light source (as we are aiming for heavy shadows).
We were only reshooting Heather's closeups because the lighting on the original shots wasn't quite right, and my writing/producing partner and I wrote new lines for her after viewing the assembled cut of the film and deciding we wanted to give her more "zingers". This shoot killed two birds with one stone.

Hope that was instructive.
 
Last edited:
^^^Thanks, Middy. We missed having the full crew there this time.

Following up on the above, here are two photos taken on set that illustrate our setup.

7275162568_ca5f1ca314_z.jpg


7275162736_715de65155_z.jpg

The first thing you probably notice is now crowded everything is. That's pretty typical when shooting closeups and tight angles. You often have to carefully weave your way between C-stands and other gear to get in near the talent. This is why you put SANDBAGS (like these) on the bases of all the equipment: to prevent a bump from starting a domino cascade of falling equipment and/or things hitting people.

Oh, I'm the schmuck in the rocking black and white fedora.

Finally, here's a frame from yesterday's "Martini shot" (because the next shot is in a glass :D
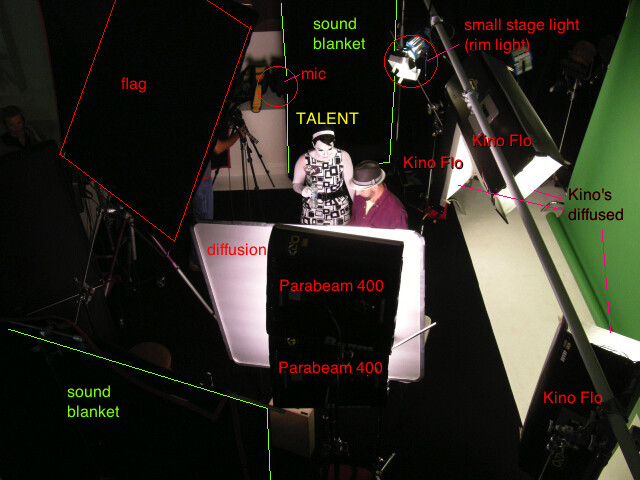
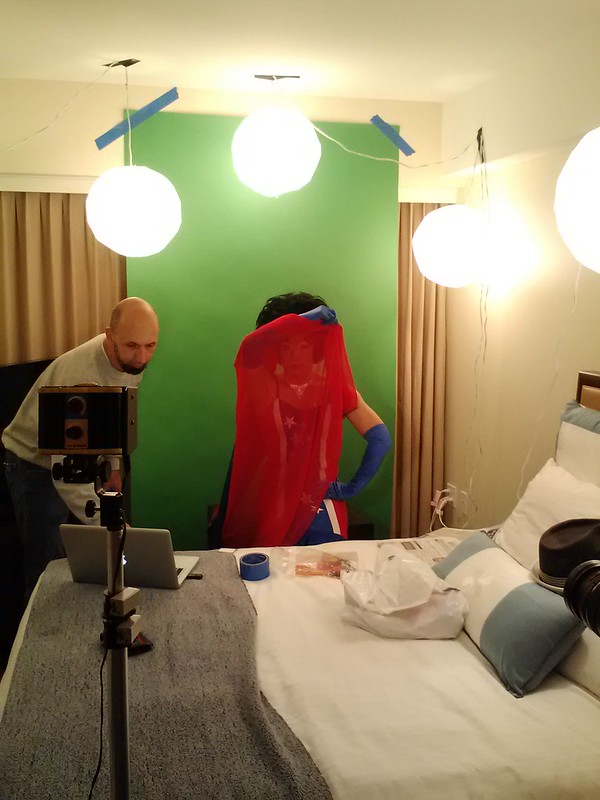
). It doesn't matter that some of the equipment is in shot because those will be cropped out with a garbage matte. The green merely has to be behind the items in the shot: in this case the actress, props and faux bartop.
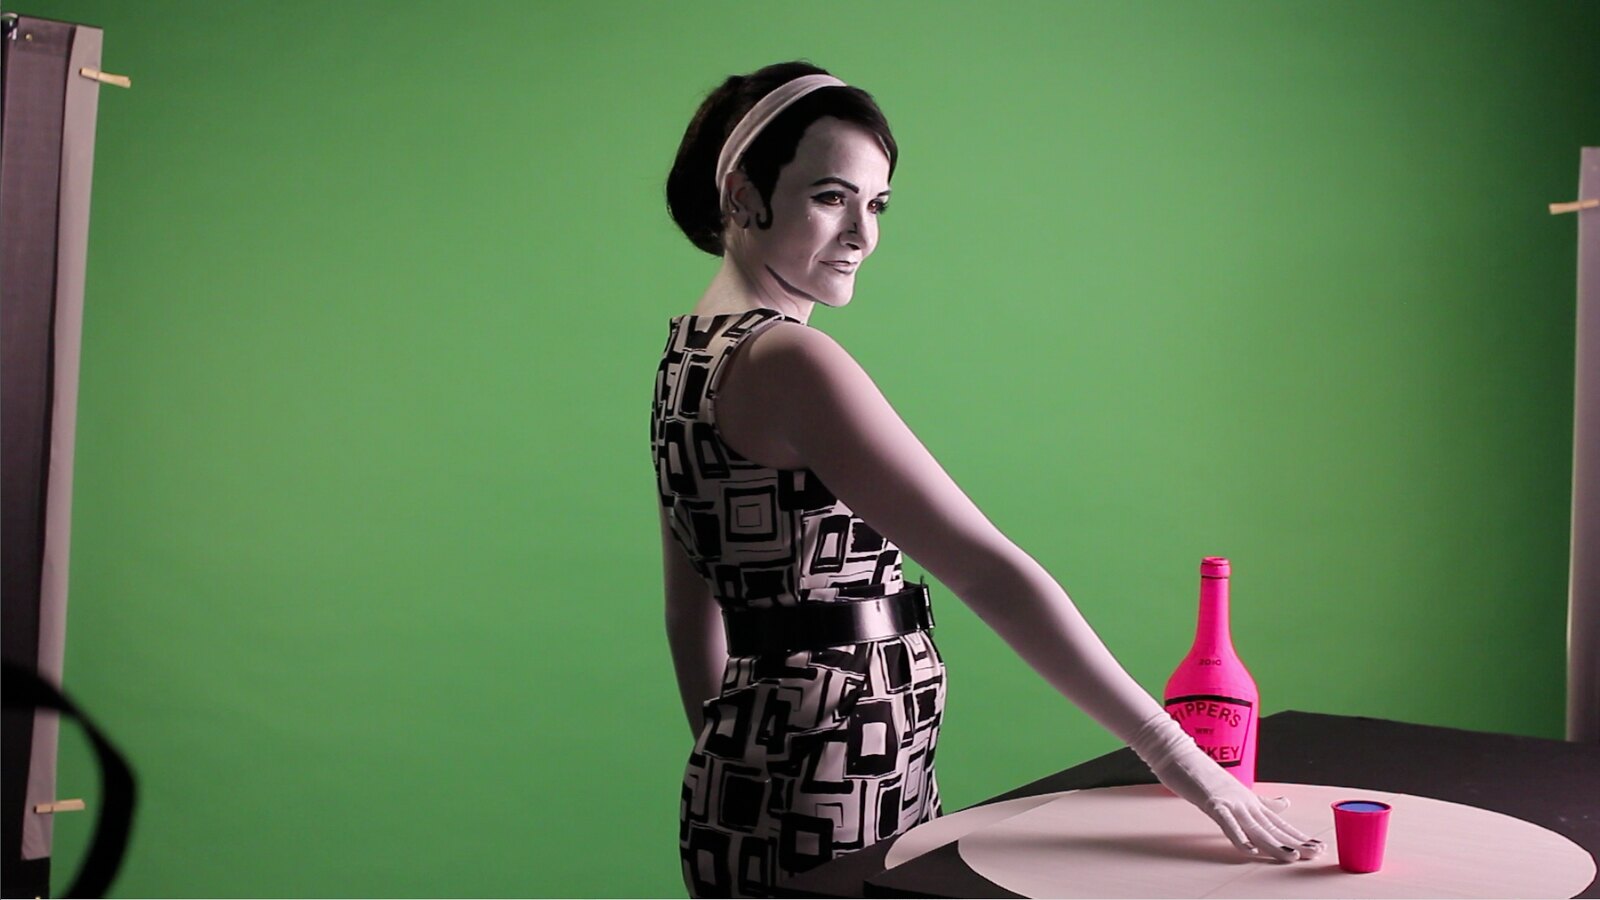
 
Last edited:
VERTICAL VIDEO SYNDROME (VVS)

To view this content we will need your consent to set third party cookies.
For more detailed information, see our cookies page.

On the lighter side of cinematography... ;)
 
Last edited:
I am cackling maniacally. Okay, I'm done. Now I'm passing that on for folks in my group to enjoy.

Thanks, Maurice!
 
I've had some discussions recently with some fan fimmakers about some of the "rules" I've mentioned in this thread. One that keeps coming up is The Line, so I thought I'd revisit this, using something more contemporary than the original Star Trek to illustrate it.
The Line, Part 2

To recap, from the original example (full post LINK here)

Let's get on to some cinematography basics, starting with...
THE LINE

In short The Line is an imaginary line you draw between two players in a scene, and which extends through them.

Let's say you shot the above scene. You've established that Kirk is to screen left of Sevrin, and must look to screen right to face him. If Sevrin faces Kirk, he must face screen left. Now, if you wanted a closeup of Kirk without Sevrin in the frame, you'd have to stay on the same side of The Line, so that Kirk's eyeline still goes to the right side of the frame.
5343594179_c3cac29754.jpg

In all the camera positions to this side of the line, Kirk's screen facing is always to the right, even if we looked over his shoulder or over Sevrin's shoulder
The basic rule of The Line is that once you establish it, you cannot cross it. This is because The Line establishes direction of looks, movement and relative positions in relationship to the camera. It makes it possible to maintain a sense of screen direction and where things are even when you change setups and angles.​
In the previous post I used some frames from "The Way to Eden" to illustrate the rule, and what steps and editor would take to ensure it was followed. But modern TV shows and films move the camera around a lot more than than in the 60s, so you might think they're looser about such rules. Let's see...
7573389612_b008373e63_z.jpg

In the preceding and following frames, notice that The Line that's set up in this scene is between Kirk and Spock, so that any time Kirk looks at Spock his gaze is to camera right (right side of the frame), and any look from Spock to Kirk is to camera left. The camera goes to various distances and framings, but it DOES NOT cross The Line.
7573389202_95c31a6f4b_z.jpg

7573389148_b932e0b949_z.jpg

7573388968_7feba55635_z.jpg

7573389016_984f3b2042_z.jpg

Notice also that Pike's eyelines re Kirk and Spock are not similarly consistent: that's because in this context we as viewers see him only in terms of his relationship to Kirk and Spock, who are the focus.

Next, we see something new, because Kirk is talking to Pike, and a new Line is drawn between them, but notice that the framing typically would keep Kirk's eyeline to Spock the same as before. The only time this is broken is when the camera goes behind Kirk to see Pike, but it still obeys the new Pike to Kirk Line. This isn't a problem because Spock and Kirk aren't interacting AND we know where he is when off-camera because we've previously seen his relationship to Kirk and Pike.

7573388906_1bc910f43b_z.jpg

7573389092_31343b4000_z.jpg

7573389392_3a2d9f5c99_z.jpg

7573389434_117629303f_z.jpg

7573389328_930d754154_z.jpg

Next, Pike turns to hear Uhura, and this a third Line is established between THEM, with Pike's eyeline to camera left and Uhura's to camera right. Technically, we've crossed the Kirk Spock Line here, except that the focus now has shifted off Kirk and Spock to Pike and Uhura.
7573389550_76ae117ecd_z.jpg

7573388862_2b17f9205b_z.jpg

Finally, when the conversation jumps back in close with Spock and Kirk addressing Pike, the camera pops back to obey the first Line, with Kirk facing camera right and Spock left.
7573551850_7dda5783a4_z.jpg

Now, the thing about The Line is it's not permanent. You can draw a new line via a camera move (like dollying, or jumping way back to reveal the character relationships from a new angle) and/or having characters physically move.

If all that seems confusing, let me try to summarize why staying to one side of the The Line works:

EYELINES IN OPPOSITION
Simply put, when you stay on one side of The Line the eyelines of any two characters will always be in opposition when they face. This is what you see in the real world when you see two people looking at each other. When you cross The Line and the eyelines are not opposed then the characters do not appear to be looking at each other.

So, at it's core this isn't a cinema RULE as much as it's cinema adapted to take advantage of how we perceive cues in the real world.​
 
Last edited:
Another thing here is that everyone is visible in the frame at all times. Here you could even cross the line without causing too much confusion, as the people facing each other would still all be visible in the frame.


But when you film dialogue in a way where you see only one character at a time inside the frame, then the line becomes even more important.

[yt]http://www.youtube.com/watch?v=hrMmiUSVRRI[/yt]

And notice how they lead you from one character to the next by letting the characters turn their eyes to them before they make the cut.
 
Another thing here is that everyone is visible in the frame at all times. Here you could even cross the line without causing too much confusion, as the people facing each other would still all be visible in the frame.

But when you film dialogue in a way where you see only one character at a time inside the frame, then the line becomes even more important.


And notice how they lead you from one character to the next by letting the characters turn their eyes to them before they make the cut.
To view this content we will need your consent to set third party cookies.
For more detailed information, see our cookies page.
^^^A good example. And you'll notice they never cross The Lines between Sly and Ahnuld and Ahnuld and Bruce. So what you're seeing here is a great example of The Line in action. You always know who is looking at whom.
 
Last edited:
I posted this over in another topic, but it seemed applicable here since it's about how I shot a recent music video which used greenscreen. There are a few photos that show a simple greenscreen setup, etc. I'm reposting here, with a few modifications, but SPOILER CODING it so it won't clutter up the thread here if you've read it in the other thread.

(slightly modified from the original post)

Last week I was contracted to do another music video for The Kinsey Sicks. Due to a number of factors, this had to be a fast, small shoot.

First, here's the finished video:

[yt]
To view this content we will need your consent to set third party cookies.
For more detailed information, see our cookies page.
[/yt]
Here's how it went down:


PLANNING
The original plan was to shoot a different song (a parody of "Three Little Maids from School" from The Mikado titled "Eliminate the Schools"), but the group's publicist wanted something more directly applicable to the election, so we abruptly shifted gears and agreed upon this song because it was fast and funny and really sharp. BUT, there were a few problems.

First, I had to see the show again to see the number so I could figure out how much of the stage choreo I could use (luckily, most of it). Second, was the problem of the song as recorded...

AUDIO
Although they are an acapella singing group (technically Dragappella™), I don't have the Kinseys sing live on these shoots because:

  1. you do so many takes you'd wear their voices out right before a show
  2. it's tough to mic four singers shooting in multiple locations and have the sound be consistent
But in this case, while the song is on their latest album, over months performing it they sped it way up and shortened it. We all wanted the current version, which meant re-recording it. As such, arrangement were made so that right after a show they got out of costume and we bolted over to a recording studio (at 11pm) and they recorded the song.

7836796526_a5ceda6e03_c.jpg

Studio session at Coast Recorders.
Left to right: Ben Schatz, Jefferey Manabat, Spencer Brown, Irwin Keller.

Fortunately, since they've been performing it live all year they aced it and take 3 was basically perfect. The engineer emailed me a rough "bounce" of the song in the wee hours that I could have them lip sync to (with a 1, 2, 3 at the top so they'd know when to start).

SHOWROOM SHOOT
Because of severe time pressures I'd decided the best thing to do was shoot at the hotel and showroom where they were performing. That way they could get made up and in costume early, we could shoot, they could freshen up and go directly on stage.

The showroom was convenient because we could use the stage lights for most of the lighting rather than bringing in other lights, but it meant moving about 20 tables and audio monitors right before a show and then getting everything back in place before they had to let the patrons in.

COVERAGE
For speed, I decided to limit the coverage to:

  1. super wide shot that I could do a matte extension on (the opening shot)
  2. full shot of the entire group
  3. 2-shot of "Trixie" and "Rachel"
  4. 2-shot of "Trampolina" and "Winnie"
  5. worm's-eye view of the leg kicks
I saved the legs kicking for last because:

  • it was the shot I could live without if time ran out
  • we could have our PAs and the staff start getting the showroom back together while we got that
Kicks aside, from each angle we covered the whole song two or three times, thus ensuring sufficient coverage to get the a video together even if something prevented us from getting more.

The only things I really needed to change in the choreography were

  • have them march in place in the two-shots rather than come towards the camera
  • eliminate the bit where they turn around and grab the flags, instead we did a few takes of just the end of the song wherein the performers already the flags in hand and raised them into shot
You have to think about how this stuff will cut, and while a music video rarely needs the kind of continuity needed by a narrative film, it's good to keep in mind how the pieces might fit together or not.

As efficient as we were, we still ran about 15 minutes long, and even caused the show to be late (the audience lined up outside didn't seem to find once they were told we were shooting a video).

GREENSCREEN SHOOT
Now, once we left the showroom we had about an hour til they needed to be on stage, but I'd come prepared for this, and before we shot on the stage I, my DP and a PA had gone to one of the hotel rooms and set up a simple greenscreen (a 4.5' wide roll of chromakey green paper) and illuminated them with four 16" china ball lanterns (suspended using blue painters tape, easily removed without marring the walls and ceiling).

It's not the ideal way to light a greenscreen, but workable for a simple setup, and the only real problems were a few spots on the green were over-bright and didn't read as green as I'd want.
7836030990_2703301c04_c.jpg
"Rachel" (Ben Schatz) sings in front of a simple greenscreen illuminated by
four 16" china balls. The green was much more even from the camera POV.
The camera is a Canon 5D, operated by Mr. WA. The laptop is playing sound.

We arrived in the room, switched the lights on, got the camera in position, and were shooting within five minutes. I had each singer do the entire song twice, first sort of serious, the second more nutty. As we finished with each singer, we released them to head back to the dressing room to touch-up so the show could go on.


7836030816_7c8e496edc_c.jpg
From this angle you can see the small "beauty" light aimed at the singer's face
(foreground left). I'm starting audio playback on the laptop.
As soon as we got to the room, I started dumping the contents of the camera's first memory card into my laptop, and did the second immediately upon wrapping. This meant we had a backup (cards and computer) and I could immediately begging log and transfer of the footage after we finished. When we wrapped, I dumped the second card while we broke down the gear.

And that's it for the shoot. The next four days were wall-to-wall editorial.
 
Last edited:
Thanks, Maurice. You answered a lot of questions I had about "how it was done."

One of the things that amazes me is the sheer number of times that performers repeat things, yet still manage to make it seem fresh. I'm not cut out for that, for sure.
 
Thanks, Maurice. You answered a lot of questions I had about "how it was done."

One of the things that amazes me is the sheer number of times that performers repeat things, yet still manage to make it seem fresh. I'm not cut out for that, for sure.
Some performers can grind out nearly identical performances take after take, and others change it every single time. Even shooting this, I was amazed by all the little differences in terms of gestures and facial expressions. There's a terrific expression on Trampolina's face on the line "It has allure" that happened only in that one take I used. You have to keep your eyes out for that!"
 
New topic:

SHOOTING GREENSCREEN

There are a few tricks about setting up a greenscreen that fan filmmakers should be aware of.

1. You want to keep the greenscreen as far away from the talent/objects in front of it because it:
  • prevents the latter from casting shadows on the green
  • helps minimize the chance of green "spill" onto them
  • allows you more latitude in positioning lights to hit only the former or latter
2. Take the time to minimize wrinkles and folds in the greenscreen. The smoother and flatter it is, the easier it is to get a clean matte.

3. Put tracking markers on the green even if you're not planning to move the camera. Two or three small X's of tape will do, placed where that the actors/props won't pass over, or done with green tape of a different shade. Easy to crop out, but handy to have if you decide you DO want to pan or tilt or dolly, as it will help keep the background aligned.

4. You want to try to light the screen so that it appears a relatively even green without hotspots or dark spots, because the amount of color information in the extremes is lower and ergo harder to key out.

5. While keying software typically lets you key out virtually any color, the reasons green is the most common keying color are:
  • a chromakey-green screen requires less light to properly illuminate than a blue screen.
  • on most digital video cameras the information in the green channel is typically the sharpest
  • there's very little green in most flesh tones
6. To minimize green spill on hair or other shiny parts of a costume, use a top or backlight with a MAGENTA gel on it. Magenta is the opposite color from green, and will tend to neutralize green reflections. You don't need much of it, just enough to kill the spill, so to speak. Be certain such lights are flagged so as not to hit the greenscreen. (You can eliminate any magenta tint on the actors in a color corrector, assuming you don't overdo it).

7. LOCK THE EXPOSURE. If you're using autoexposure (I recommend not), once you have the shot looking right switch the autoexposure OFF, otherwise the camera will keep adjusting the exposure because your actors are moving and this will make keying messier.

8. CHECK THE FOCUS. The mushier the focus, the harder a time you'll have getting a good matte. As with autoexposure, don't use autofocus.

9. Watch the shot on a monitor. Most small cameras screens are small enough where you might not notice if the focus is slightly soft, etc.

10. Don't worry about anything part of the greenscreen that nothing passes in front of. Cropping and garbage mattes are used to get rid of any parts of the frame where foreground objects don't cross.

11.Shoot a CLEAN plate for every setup, meaning shoot the greenscreen without anything in front of it for a couple of seconds. Why? Some keying software has the option of allowing you to use a "clean" frame" as a reference, and it compares each frame of the shot to the clean frame to look for differences, sometimes making for sharper mattes because there's more info to work from.

2016 EDIT TO ADD:

12. USE THE LOWEST ISO YOU CAN! The higher the ISO the more "noisy" your footage is likely to be, and the harder it will be to pull a clean matte. If your image looks dark, put in more light instead of lowering the ISO! (At the same time, keep the "zebra stripes" mode on your camera ON so you can see if you have hot-spots which can cause other problems.)

...annnnnd this...

To view this content we will need your consent to set third party cookies.
For more detailed information, see our cookies page.
 
Last edited:
k. Thanks; what I thought you meant.

allows you more latitude in positioning lights to hit only the former or latter

I believe you also added that text, and that makes that point much more immediately understandable, too.
 
If you are not already a member then please register an account and join in the discussion!

Sign up / Register


Back
Top