Incredible work. I basically stick to out of box now and haven't done any scratch building in years, and never anything even close to that. Absolutely awesome.
-
Welcome! The TrekBBS is the number one place to chat about Star Trek with like-minded fans.
If you are not already a member then please register an account and join in the discussion!
You are using an out of date browser. It may not display this or other websites correctly.
You should upgrade or use an alternative browser.
You should upgrade or use an alternative browser.
A Two-Thirds 33 inch Enterprise
- Thread starter Shaw
- Start date
I'm impressed
Yeah, I didn't have much. As I recall these were just about all the references I had to work from at the time...Say, Shaw, that's not bad at all, and seems very accurate given what resources you must have had available at the time. I'd have loved to have seen that model...")

And they were all printed images (from before I had computers that would let me dissect them for study) and measurements were made from Xerox copies or tracings (so as not to damage the originals). Of course I also didn't use computers for drawing them either, they were done using traditional pencil/paper and ink/vellum techniques.
Strangely enough the final model looked a lot like the final study model of the Excelsior (but with better paint and hull graphics). Shortly after finishing my model the kit came out, and I built one of those into the USS Hood (and used fiber optics for lighting it).
Wow, it's even more incredible that those were your only resources and it came out so accurate.
I don't suppose you have pictures of it or the Hood model laying around?
")
Maybe (while I'm hemming and hawing on which direction to go on this model) we could use this thread to discuss the history of the model I'm attempting to replicate. The original thread that was used two years ago while I was working on my plans is gone because the old site software deleted threads after a certain age.
People still seem to wonder about this model and I was short on details in my plans as I was more concerned with the drawings (and the models geometry) than the history at the time. Since then I've been collecting together a lot more about the history (of both models), and can even point out which episodes featured the 33 inch model in all three seasons.
So in the next few days I'll put together that information, along with some before and after diagrams of the model discussing the differences between how it looked in The Cage/WNMHGB and how it looked when altered to better match the series alterations made to the 11 foot model.
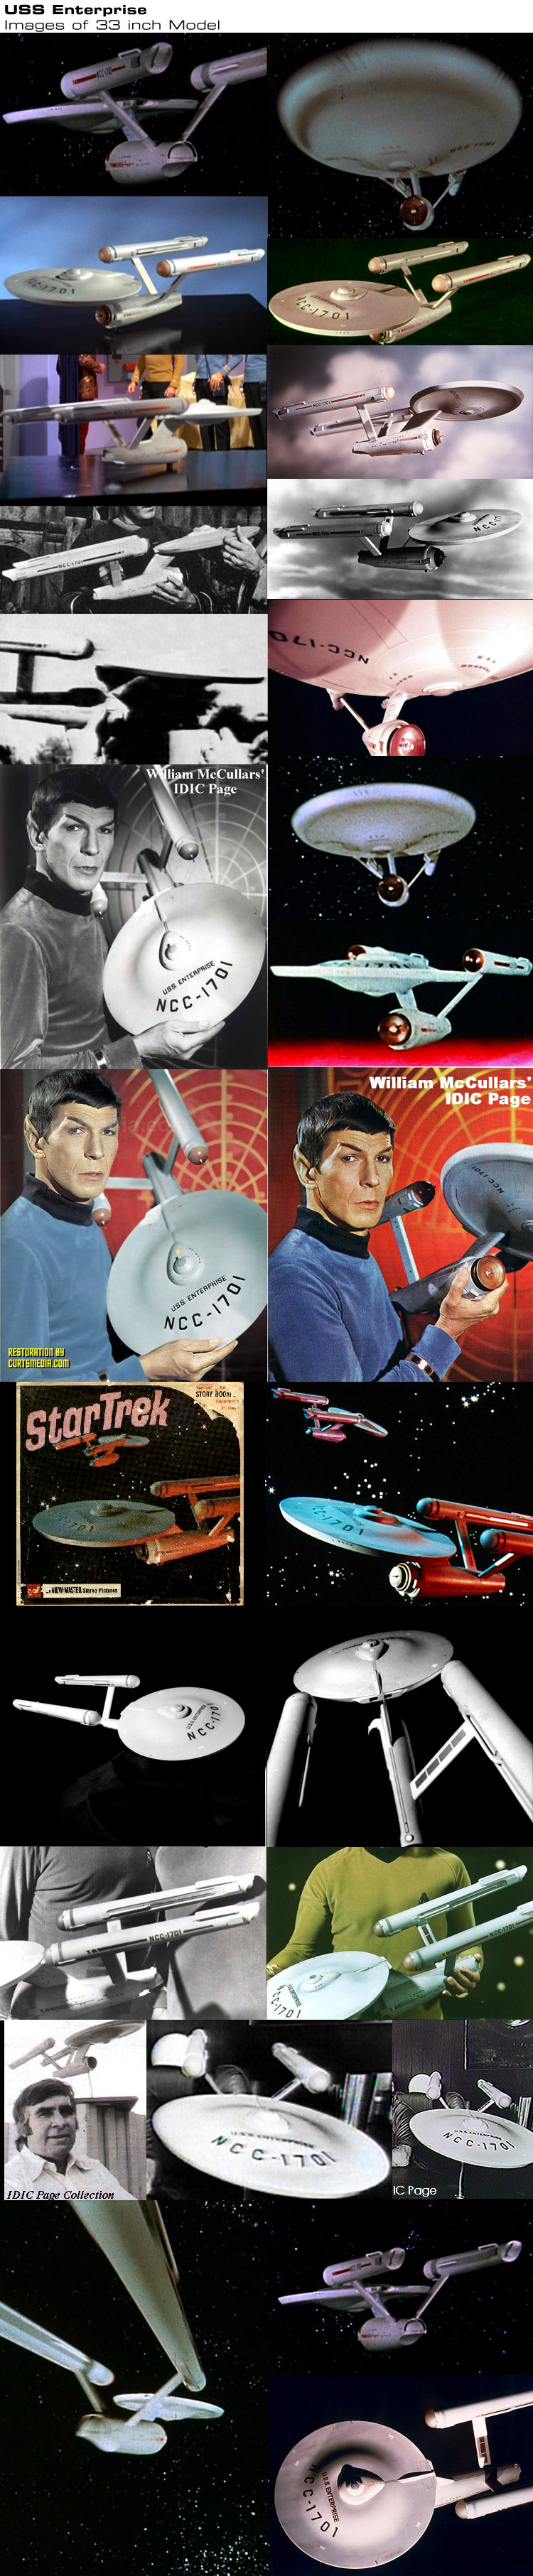
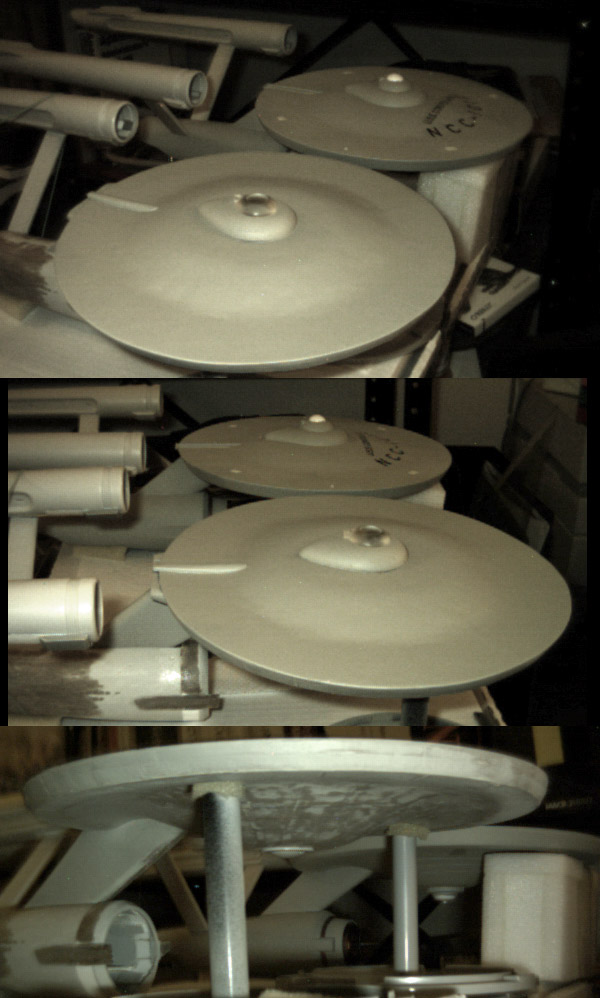
To get started, here is a collection of images of the 33 inch model I put together a while back.
And a review of the early production history...
- Nov. 4, 1964 (Wednesday): Richard Datin agrees to build an approximate three foot long model based on an early set of plans which give a real world scale of 1:48 (if this had been the final drawings, this would have been the 540' version, but the proportions of this early drawing are actually significantly different from the final plans).
- Nov. 7, 1964 (Saturday): The final construction plans are finished. These plans include the scale reference of FULL SIZE & 3" = 1'-0" TO LARGE MINIATURE. My reconstruction of those plans can be found here.
- Nov. 8, 1964 (Sunday): Richard Datin receives the plans and starts building the full size 33 inch model out of kiln-dried sugar pine.
- Nov. 15, 1964 (Sunday): A little more than a week later the 33 inch model is presented to Roddenberry for approval. I'd guess this is where the addition of exterior windows was requested (which were not part of the original design), and the model returns with Datin after this viewing of it.
- Dec. 8, 1964 (Tuesday): Construction is started on the 11 foot model.
- Dec. 14, 1964 (Monday): The 33 inch model is delivered to Roddenberry for final approval while The Cage was being filmed in Culver City (there are images of Hunter and Roddenberry examining the model on this date). This model is used for all effects shots in The Cage except the most important one (the zoom in on the bridge).
- Dec. 24, 1964 (Thursday): Shooting of The Cage wraps, only one effects shot still outstanding (all other model shots use the 33 inch model).
- Dec. 29, 1964 (Tuesday): The 11 foot model (built by Datin, Mel Keys and Vern Sion) was delivered to the Howard A. Anderson studio. This version is unpowered and the windows are painted on the surface of the model... and even then the model was designed to be shot from the right side only.
- Jan. 23, 1965 (Saturday): After The Cage is already in the can and waiting for network approval of the new series, additional test shots of the 11 foot model are taken in it's original condition.
- Jan. 30, 1965 (Saturday): Aspects of the ship's size (like it being 190,000 tons) were being distributed to the media in the descriptions of the new show.
I'm still working on nailing down more info, but this is a good start.
As for when the model was seen, I'm working on a shot list, but in generally it was seen in every episode of TOS (as it went swooshing by in the opening credits). It was used for all but the bridge zoom in shot in The Cage, it was used for the shot of the Enterprise leaving the barrier in WNMHGB. It was used for the shots of the Enterprise from below in Tomorrow is Yesterday (two different angles). Though it was generally retired by the second season (an AMT model of the Enterprise was constructed to take it's place at the same time as the Constellation was made), it did appear in By Any Other Name (exiting the barrier and zooming towards the Andromeda Galaxy) using shots of the model from WNMHGB and The Cage. In the third season it appeared in Is There In Truth No Beauty? (two speeding Enterprise shots before entering the barrier and one of the ship exiting the barrier), again using shots of the model from The Cage and WNMHGB. It's last appearance on screen (and the first using new footage since Tomorrow is Yesterday) was in Requiem for Methuselah when it played a reduced Enterprise sitting on a table top (and what I am aiming for my model to generally look like when finished).
I think it is generally known that after the series ended it was given to Roddenberry (who displayed it on his desk throughout the 1970s), but was lost after it was loaned to someone in the early 1980s. The person (or persons) didn't return the model and Roddenberry claimed to have forgotten who it was that he loaned it to. It is still missing to this day.
Any idea why the 33" model was retired in favor of an AMT kit? That's rather weird to me. I'd love for that 33" model to be found.
(And I suppose technically that means three models have 'played' the TOS Enterprise and makes the AMT version a little more valid?)
Sadly I have next to nothing from before 1997... The image of me in my study (and one of my ex-wife in my study from a different angle) are all that remain of any of those models and props (with the outside possibility that a scratch built model of the USS Horizon might still exist at Hobby Central... but I doubt it).I don't suppose you have pictures of it or the Hood model laying around?
Well, from a practical stand point, any time the Enterprise was seen with any amount of detail, that could be done with footage of the 11 foot model. But when you needed it very small, it was easier to get those shots with the 18 inch model than the 33 inch model.Any idea why the 33" model was retired in favor of an AMT kit? That's rather weird to me. I'd love for that 33" model to be found.
(And I suppose technically that means three models have 'played' the TOS Enterprise and makes the AMT version a little more valid?)
It was only used a couple times (that I know of)... Doomsday Machine (Enterprise being pulled into the planet killer) and Trouble with Tribbles (one shot with it behind the K-7 station model, and a number of shots outside the administrator's office window). The AMT model of the Constellation was also used in Ultimate Computer, but that was footage from Doomsday Machine recomposed.
The model was great for Trouble with Tribbles because in all the shots of it outside the window it hardly changed size (in frame) no matter where the camera was positioned. So it had to be far enough away not to be effected by where the camera was in the room, but not so far away as to require more room for the star field than was available.
One has to remember that back then perspective was something that showed up better than small details. The 11 foot model was important because it could show off perspective nicely (making the ship seem very large), and the thought was that the AMT model could do the reverse (making it seem very far away). Most other details were likely to be lost by the time people saw it on their TV screens, which is why they had no problems using three models (including the 11 foot one in three different configurations) throughout the run of the series.
And thanks again for the encouragement guys!

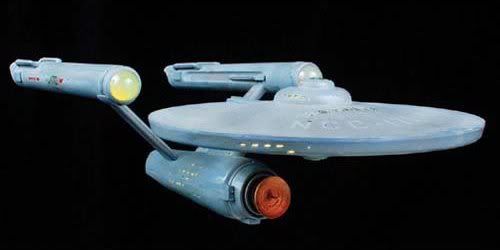
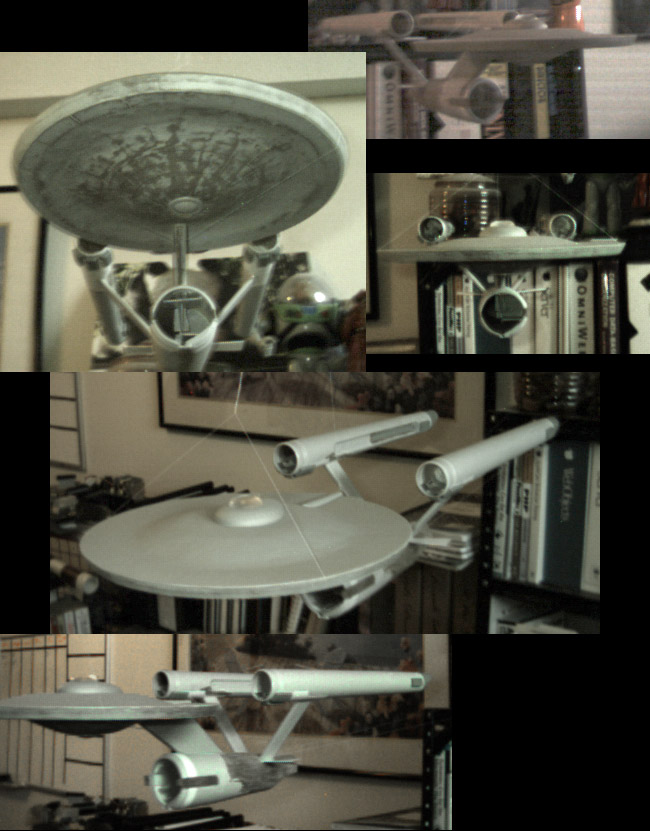
And here's that 18" model nowadays, when it was in one of those "Profiles in History" auctions a while back...
Personally, I'd be kinda torn on whether to get new decals for this thing if I ever got it. Would that ruin the historical value of the piece?
Personally, I'd be kinda torn on whether to get new decals for this thing if I ever got it. Would that ruin the historical value of the piece?
I would think that if you used original decals from the first edition long box, and matched their position to the ghosting of the old decals on the model, that it would be considered an authentic restoration. Anything else beyond that (like modifying the paint on the model) would venture into the range of damaging it's value though.Personally, I'd be kinda torn on whether to get new decals for this thing if I ever got it. Would that ruin the historical value of the piece?
That brings up another question: Would a decal sheet from '67 even still be usable?
And here's that 18" model nowadays, when it was in one of those "Profiles in History" auctions a while back...
Personally, I'd be kinda torn on whether to get new decals for this thing if I ever got it. Would that ruin the historical value of the piece?
That's really cool to see. Am I correct in the belief that the original version of this kit actually lit up if you put it together properly?
The best reference I know of is this article: History and Evolution of the AMT 18" U.S.S. Enterprise kit. Because it seems that many (if not all) of the parts were eventually retooled by the mid-1970s, most 18" kits share only a general resemblance to the ones used in the series for the Enterprise and Constellation models.That's really cool to see. Am I correct in the belief that the original version of this kit actually lit up if you put it together properly?
As I recall, the early kits were designed to have the top and bottom dome light up, and little else. So that model of the Enterprise used in the series was pretty heavily modified to include those elements (though it seems like a wasted effort as you couldn't see the lights on that model in the show). And it also may have been the ability to add lights that pushed them towards using the 18" model in favor of the 33" model (which was solid wood so could never be lit from within).
The one pictured above is possibly the much rarer '67 version, which also had lit-up clear amber nacelle caps in addition to the upper and lower sensor domes in the primary hull.
Or, they had a couple of clear resin castings made of the nacelle caps. Either one's possible.
As for why the attention to detail, you never know what's gonna show up on screen until you see it in the dailies, so better to have a little more detail than you need than have a blank white model on screen at a point where it's too late to fix it.
I wanted to discuss an omission (error) from my 33 inch plans... the spine on the back of the primary hull. Part of the reason for this model is to help iron out details from the original model and find mistakes in the first version of my plans. And I'm bringing this part up because I just finished forming that piece even though it's real geometry is absent from my plans (and I'm still not sure how to draw it to convey it correctly).
Building it wasn't especially difficult. What I used was a BIC pen that I cut in half and sanded off to fit the contours of the hull. It is actually at an angle (sloping up as it goes forward), and is flattened out (or squared off) over the impulse engines.
On the pilot version that is all there is to it, but when modified for the series an additional raised line was added along the top (to better match the 11 foot model).
Here are some comparison images of my piece and the original... mine isn't finished yet and is just sitting on the model for these images.
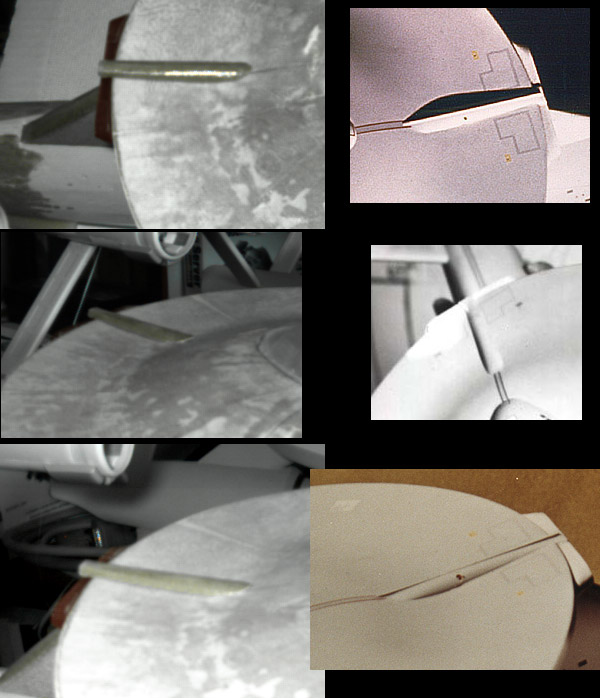
It is interesting to note that in addition to the drilled holes on either edge of the original model's primary hull (which I noted in my plans) for hanging it (which were not drilled directly across from each other), a hole was drilled through it's spine too.
Building it wasn't especially difficult. What I used was a BIC pen that I cut in half and sanded off to fit the contours of the hull. It is actually at an angle (sloping up as it goes forward), and is flattened out (or squared off) over the impulse engines.
On the pilot version that is all there is to it, but when modified for the series an additional raised line was added along the top (to better match the 11 foot model).
Here are some comparison images of my piece and the original... mine isn't finished yet and is just sitting on the model for these images.
It is interesting to note that in addition to the drilled holes on either edge of the original model's primary hull (which I noted in my plans) for hanging it (which were not drilled directly across from each other), a hole was drilled through it's spine too.
Well, the best way to describe the difference would be that the 11 foot model's spine is more boxy. This isn't that surprising as it is a removable cover for the primary hull nut and bolt. The best images of that part can be found here and here.How does this compare with the 11' model?
I've been finishing up some aspects of the primary hull and decided this was a good point at which to paint it to see how things are progressing (I haven't painted the underside yet)...
I'm pretty happy with the results, though I'm just happy that I've (for the most part) captured the shape of the model that I've wanted all these years.
This is what I get for missing staff meetings--I had no idea you had released those blueprint reconstructions, Shaw. Beautiful work, both on the blueprints and the model

I still say that Gene Jr. has itI think it is generally known that after the series ended it was given to Roddenberry (who displayed it on his desk throughout the 1970s), but was lost after it was loaned to someone in the early 1980s. The person (or persons) didn't return the model and Roddenberry claimed to have forgotten who it was that he loaned it to. It is still missing to this day.
He's been asked. No such luck.
Thanks!This is what I get for missing staff meetings--I had no idea you had released those blueprint reconstructions, Shaw. Beautiful work, both on the blueprints and the model
Well, soon I'll have version 2.0 ready... which will include both the pilot and series configurations (rather than just the series version which I did before), so you'll have even better references (better meaning fewer errors
 ).
).____________
I forgot to post this here...

I've glued the nacelle supports to the nacelles. This was always going to be an interesting issue as I had removed the supports and covered up their original connection points on the nacelles themselves, and was going to need to figure out how to re-attach them.
My solution was to cut a paper clip and then bend it into a squared off "U" shape, cut two small holes in the nacelles at the new connection points, and have the ends stick out of the nacelles and into the opening on the supports.
Realizing that the straight wire might be an issue, I created a slight zig-zag in the length of them, and filled the end of the support with glue, put glue around the end of the edge of the support, and put them together (and let them sit for 24 hours). When the glue sets the zig-zag should help improve the anchoring of them (in theory).
Here are the early results...
The starboard nacelle seems to be just about perfect, the back end of the port nacelle is angled up a little. It should be something I can fix, so I'm not overly concerned with it. I think I'll need to have a solution worked out before I attempt to join the dorsal to the secondary hull as I'll want the nacelles and the primary hull to line up nicely. And to do that I'll need to know how the nacelles are going to sit in the final assembled model.
____________
I gave this a try today (as I've been practicing putting decals on the Constellation), and it seems to be working. The yellowing seems like it is going away.BTW: if you have decals that have yellowed (say from that 15 year old Ertl kit you bought off of eBay), put them out in the sun for a couple of days and the yellowing should go away.
Thanks for the tip!
So far it has worked out as planned, but how it works in the long run is what matters. I'm keeping my fingers crossed on it.
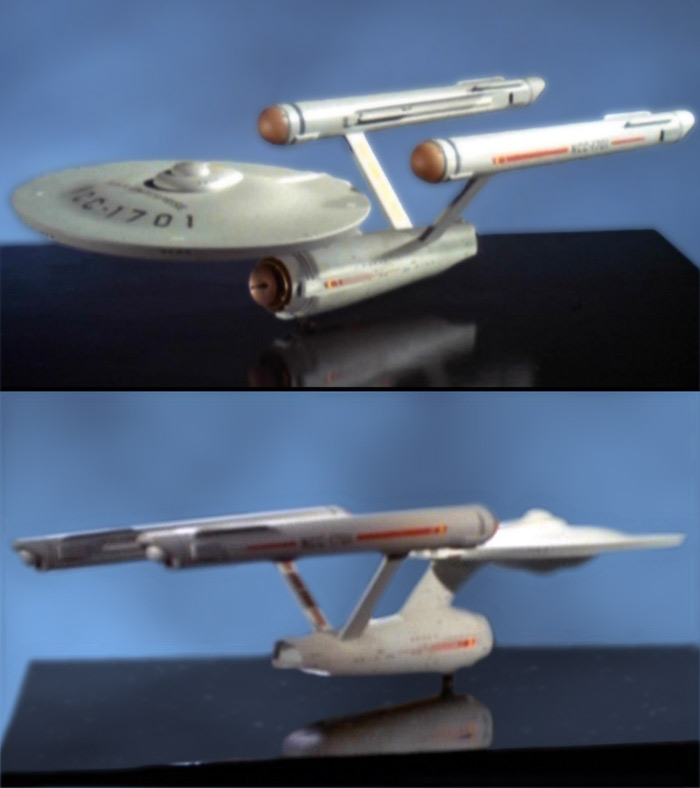
At any rate, I've been making sure that I have all the parts together and that they are fitting the way they should. Here are some images of most of the major elements assembled, including all of the elements around the navigational sensor/deflector.
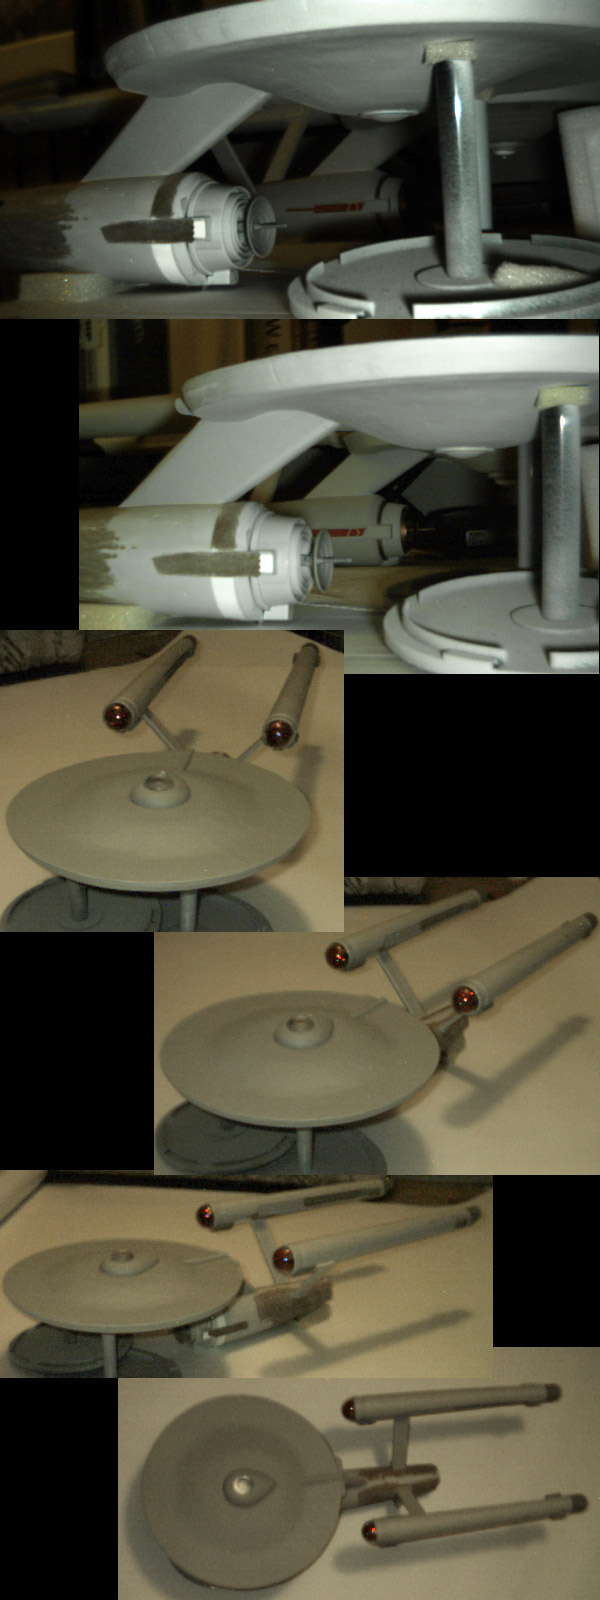
I used the red nacelle domes because they seemed to show up better when photographed at night (the gold ones work really nice in the day light).
At any rate, I've been making sure that I have all the parts together and that they are fitting the way they should. Here are some images of most of the major elements assembled, including all of the elements around the navigational sensor/deflector.
I used the red nacelle domes because they seemed to show up better when photographed at night (the gold ones work really nice in the day light).
Similar threads
- Replies
- 25
- Views
- 10K
- Replies
- 43
- Views
- 12K
If you are not already a member then please register an account and join in the discussion!