• Welcome! The TrekBBS is the number one place to chat about Star Trek with like-minded fans.
    If you are not already a member then please register an account and join in the discussion!

Ray's TOS shuttlecraft....

Picked up some foamcore today and should start cutting pieces soon.

Now I need some advice for down the road. How can one make a sound chip? You know some of those greeting cards that play music when you open them or toys that make sounds when you press a button. Well I know those are chips (I believe), but is it hard to make one? I have the sound effects and such of what I want as audio files on my computer and I want to know how to make my own sound chip to put into the model so when I press a button on the display stand it will play the sound effect.

The three separate audio tracks are 1:20, 1:16 and 1:15 seconds each in duration.

Anyone?
 
Last edited:
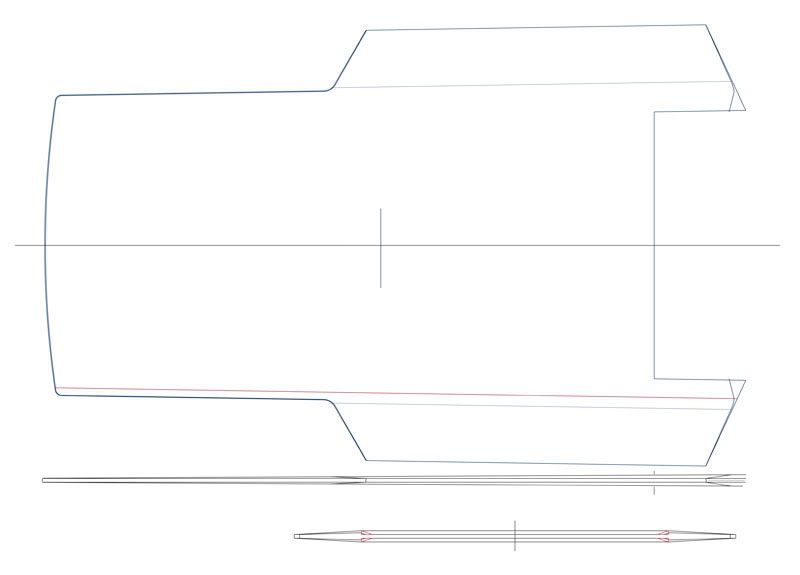
I printed the first pattern today: the stabilizer and rim all as one piece. Hopefully I'll cut some foamcore today before the hockey comes on. Montreal/Toronto and last game of the season---I gotta watch that.
 
Picked up some foamcore today and should start cutting pieces soon.

Now I need some advice for down the road. How can one make a sound chip? You know some of those greeting cards that play music when you open them or toys that make sounds when you press a button. Well I know those are chips (I believe), but is it hard to make one? I have the sound effects and such of what I want as audio files on my computer and I want to know how to make my own sound chip to put into the model so when I press a button on the display stand it will play the sound effect.

The three separate audio tracks are 1:20, 1:16 and 1:15 seconds each in duration.

Anyone?


First of all, very nice work on your project designs. Concerning the sound chip, instead of trying to build one, might it be possible to cannibalize one of the recordable cards or storybooks for the chip? Playing your sounds through a good system and recording them with the chip might produce the results you are seeking...at a minimal cost. Just a thought.
 
And we're off...

Step1.jpg
 
1/16 of an inch seems like a big thing on a model of this size (and of this scale), but it's awfully small when trying to cut something that small out of something like foamcoare or bristol board.

If you really look at the side view of the stabilizer and rim you can see that it tapers from the aft end and going forward. And it's a very gentle taper over a length of about 18in. At its thickest at the aft end the stabilizer is about 3/8in. and at the forward edge it's only about 1/8in. So while the centre piece photographed above is about 1/8in. all over that means I have to get a gentle slant above and below it of only 1/8in. each respectively. I've already got a solution for when I make the final model out of sturdier material, but it's more challenging with softer and more flimsy material.

The stabilizer also tapers from the side of the hull and outward to the stabilizer edges. You can see it in the front on view which is the bottom image. Fun times...

Stabilizer2.jpg


The real challenge is that with this practice run bristol board is standing in for either sheet balsa or sheet styrene, either of which has sufficient rigidity to help get that taper just by being supported in a number of spots spaced over the length of the centre piece. But bristol board doesn't have that kind of rigidity so I was trying to cut a 18in. long triangle only 1/8in. at one end---not so good. It occurs to me that since this is just a practice run I can still resort to spaced supports using thicknesses of bristol board to get what I want. Or I don't actually have to have my long triangle end in a point. The last couple of inches or so could go unsupported.

Of course another approach would have been not to do the stabilizer as I'm doing now but rather building it like an airplane wing with an internal framework. I just thought that would have been more work and perhaps even more difficult.

The other thing I'm pondering for down the road is a display pedestal. I've looked around on line and gotten some ideas, but I didn't really see anything that appealed to me. Actually most of them were for model aircraft and they all looked much the same. It wouldn't surprise me if I have to make the display pedestal from scratch as well. Ideally I would have liked something made of clear acrylic so the stand isn't so noticeable, but I could settle for something else.
 
Last edited:
Got some feedback today on a related matter. My brother-in-law is looking into what is involved in programming a sound device for this model. Essentially I want to build into the display stand (if possible) some sound files that including accelerating and landing sounds as well as music tracks and voice samples. A couple of years ago (for a different project) I created some cool sound files that sounded like they could be tracks lifted right from scenes on TOS episodes except they're mixes taken from different places. Added to this model it would give it an added element.

What's cool is it's beginning to look like this could be affordable and I could program it right from my own computer.
 
Last edited:
Are you going with LED and fibre-optics for lighting? Low power and ease to work with. Though really, it sounds like a silly question to ask in the 21st century...

Are you building everything we've seen and nothing more, or will you extrapolate from what we have seen and interpret the rest of the guts?

It may sound odd, but in the conservation field (musems- my background), it's common to make the missing filler pieces of an artifact actually look different from the artifact itself, in an effort to emphasize what is there. Bear with me- in this case, make everything we've seen like it looked, and then make your interepreted guts all a different colour. It shows what could be, while still allowing the viewer to focus on what is...

Just a thought. A little silly for what you're probably shooting for here.

I look forward to seeing this progress. It's one of my favorite shuttles.
 
^^ I'm only building the exterior based right off my drawings. I think building the interior could be just a little too challenging for me. The other issue is that I'd have to have some way to show an interior if I went there and the only way I could think of doing that would be to have an upper section that comes off, and that would likely mean a seam where there isn't supposed to be one.

Of course another way to do it would be to build a cutaway model, but then again I wouldn't have the exterior I want.

If this comes off the way I envision it then I'm hoping to try doing some special effects visuals with it.
 
Can't wait see it warped9 I'm building your version of the class H at the moment also building the other three shuttles enterprise use. All paintwork nearly done I will post some pictures on here once finished just working on the sinage for each shuttle waiting for my clear decal sheets to come .!!!
 
Argh! I can't cut the foamcore the way I want because it's just not rigid enough. So I've got another idea. I'll cut some bristol board in long triangles then score and fold them down the middle. I tried one and it worked reasonably well so I'm going to pursue that approach.

I have to keep remembering that this is a practice run and doesn't need to be pretty. I suspect that cutting sheet plastic and/or sheet balsa the way I need should be easier.

Really? I'm actually a little surprised. I used tonnes of the stuff in college. I loved it!
 
^^ I'm only building the exterior based right off my drawings. I think building the interior could be just a little too challenging for me. .....

Just a thought but you could do the interior model as having what's referred to as a 'phantom' hull, such being either a transparent shell or simply no shell at all.

Mind just my interest but seeing a TOS shuttlecraft skinned and bare bones on display would be very much enjoyed.

Nice work !
 
Argh! I can't cut the foamcore the way I want because it's just not rigid enough. So I've got another idea. I'll cut some bristol board in long triangles then score and fold them down the middle. I tried one and it worked reasonably well so I'm going to pursue that approach.

I have to keep remembering that this is a practice run and doesn't need to be pretty. I suspect that cutting sheet plastic and/or sheet balsa the way I need should be easier.
Laying in bed before sleep I kept turning this in my mind, considering different approaches, until I hit upon a solution.

My basic concern was that I wanted the stabilizers to have solid support to forestall any possible sagging when supporting the weight of the support pylons and nacelles. Hence I thought the best approach was to have the centre part of the stabilizers go all the way through the main section of the model to the other side and I would build the upper hull on top of it and the lower hull below it and thus giving it added support. But the stabilizers have a gradual taper from fore to aft and the challenge was how to do this. I realized that the stabilizers at their widest point only have to support the nacelles and the rim around the forward section of the hull doesn't have to support anything. So my gradual taper doesn't have to go all the way through but apply only to the outer visible edges. So I can still build my upper and lower hulls onto the main part of the stabilizer and add my tapered rim to the sides of the hull. When assembled, filled, sanded and painted it will look exactly like it's supposed to and it will be simpler to construct.
 
If you are not already a member then please register an account and join in the discussion!

Sign up / Register


Back
Top