• Welcome! The TrekBBS is the number one place to chat about Star Trek with like-minded fans.
    If you are not already a member then please register an account and join in the discussion!

MKF's non TREK WIP

Madkoifish

Commander
Red Shirt
Well figured I would give this a go, instead of doing subject threads I will keep all the non trek stuff in one thread. Starting it off is some Tenchi Muyo work mostly cause I am feeling a bit aimless and disinterested in the current projects. I dunno how many cross board here but I have generally kept my 2d and non trek stuff off this board. If you want to see more Id suggest my DA http://rushedart.deviantart.com/ or Foundation3d.com

I will just cnp the post content in quotes.

I dunno how many of the ships I will do from this series, maybe just Ryo-Ohki.

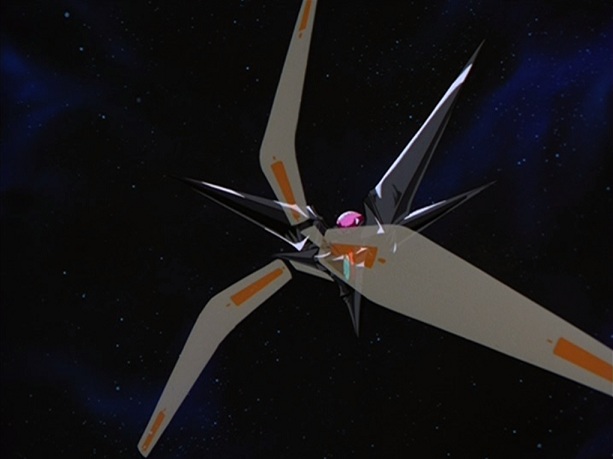
It is odd such a simple shape but it is a real pain to model as I cannot really break it up into a easily rotated form. So it is a lot of rough work that has to be nailed then I have to reseam the overlaps All the rounded buldgy bits, then re-edit it all to clean up the shapes. The real fun will be the translucent effects as the idea I had is to have this be like obsidian where the thinner bits will be transparent. The red gem is really the only bit that IS the ship itself as all the interiors of anything Washu has made or Jurai ships are dimensional distortions, or re-locations. (think TARDIS)

Anyhow I have no real exactish idea how big the ship is nor any proper orthos, I am mostly using the OAV series 3 footage. Heck there hardly is anything online. Mostly horrid frightening costumes of the animal form of the ship. So I am winging it and well likely to add my own take on the thing over all.


I have chosen the latter form of the ship I think it first appeared in this configuration in GXP. Likely due to the fact it is easier to model in 3d and the fact anime has gotten horridly lazy since the change over from cel animation IE not many skilled in rendering hard surface objects in perspective etc. I went with this form not because of that easy side but because I like it best of the forms except the one she took while absorbing Ayeka's crashed ship core "Ryu-Oh" (the red disc thing) So, I might take a stab at that as well.

ova-5-2.jpg


Before it was wrecked.
latest

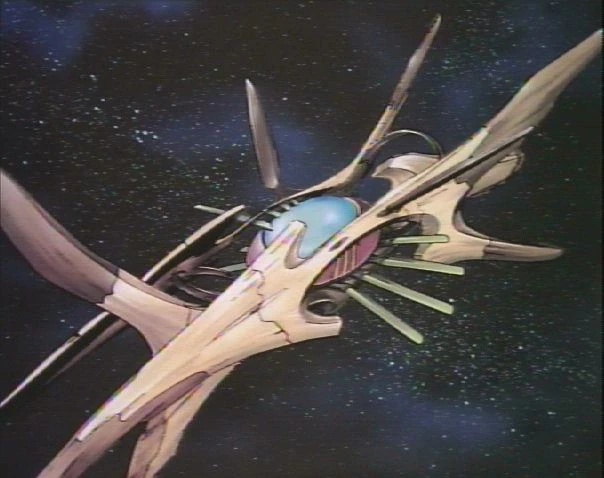
I am guessing these things are somewhere around 100m as they are shown above a lake that Id figure is about a city block wide. I could be off as well stats for this sort of thing are fewer than the most obscure US sci-fi series. Scale is a huge whatever on ryo-ohki as sometimes it appears to be 100m or more others like OAV3 ep 6 the gem is maybe 5m across.


I might only tackle stuff seen in the first OAV TM in love (movie) and TM in Tokyo as those are really the only art books I have. Scans or imagery is far and few as that side of the fandom has just died off. If this was 2002 I probably could find a full scan set of all the art books easily. Today forget it. The books themselves if I can find them would probably cost 10 times what they did new and that is generally not cheap either as most places bloat the prices terribly. IE 18yen book often is marked up to 30usd or more.
Enough blah blah here are some fairly ugly early renders.


If there is interest I will post anything I do that isn't trek here.
 
Some shape and scale updates. I think this is where I will sit it at size wise as I think that scene with Z was done mostly for cinematic drama so I went with something in-between what I think it really is.


NOW I have been looking at videos and what not and am thinking what is texture on the ship might be a representation of facets so I will start modeling these in once I am happy with the overall shape of the thing. I figure I will give it a few more goes before locking it down and calling it then it will be detail modeling and surfacing.

I have also taken the time to scan the OAV part 1 mook.

It also helps to read the books, Ryo-oh is 150meters, so least OAV v1 of Ryo-ohki is likely much larger than what I have here.


So the old version was at least 100m give or take.

Below are galleries for the scans you should have options for zip dl and individual image saving.
<iframe class="imgur-album" width="100%" height="550" frameborder="0" src="//imgur.com/a/Pvk51/embed"></iframe>
Screen cap refs, these may be added to over time I dunno.
<iframe class="imgur-album" width="100%" height="550" frameborder="0" src="//imgur.com/a/dagfn/embed"></iframe>

Hopefully these urls work as obviously the forum does not allow the embed code.
http://imgur.com/a/Pvk51/embed
http://imgur.com/a/dagfn/embed
 
This thing has a really cool shape... I like it. :) It looks great from the front, coming towards the camera, especially.

-Ricky
 
Well my attempt to get parti-volume to work for me to create a heavily frosted gem like effect. IE like SSS but with settings to control gloss reflection refraction. I wanted a opaque crystal effect where the transparency was only so deep before the light would scatter to the point is ceased only a foot or more into the surface then scattered out leaving a opaque core. It was all too slow to render to fool with anymore. I think parti needs some caustics set up or something that is not in my MR set up or something sadly all the tuts or information out there is very incomplete leaving out important steps to the results. So for now I will give up and just use plain old arch design to create a meh frosted crystal effect maybe with some typical caustics if I can stomach the render times. Likely I will revert to a plain material for the remainder of the modeling. I am considering doing larger details across the parts of the ship similar to a real crystal surface. I will want to approach either the opaque density thing again or see what is required to replicate the visual crud you see in real crystal say like these smokey quartz. Then again it might result in horrible rendertimes and I have not patience for 12 hour renders @1920X1200.


Anyhow here is where the model sits atm. ATM it takes ages to render. The complexity if just a matte reflective object would only take 2 min if just a plain shaded matte less than a min. fff


As for the modeling I am considering going against the points for terminus. I was toying with that flat facet that real crystal has As these sharp points though really thay are squared off just do not sit right with me.
 
Wrong version of the ship, it is also a LQ silhouette of the scans I linked earlier.
http://i.imgur.com/GfzHxB7.png

I am modeling ryo-ohki as she appears in GXP and OAV 3. It does though confirm my guesstimate is bloody close within maybe 5 to 10 meters. That is if she did not change size over time.

Note the change in shapes.


Ok here is a quick render of that one area I was talking about. While not canon I think it looks better. I also have decided I do not like the pinching in the central body that was evident in the screen caps. It just looks like sloppy subdivision to me so I will be working that out before collapsing the mesh for modeling in finer details. I am also toying with using some sort of texturing foolery to add finer details. But I am not sure as of yet.

 
Ahhh my bad i forgot about the design change in the Funimation Tenchi Series ^_^;

If you ever get your model 3D printed let me know please? :)
 
Funmation changed nothing.

The studio in Japan changed things when they moved from cel or hand drawn objects to cgi during GXP. The change over from cel animation to digitial cels has made the industry lazy so they all seem unskilled enough to hand render objects in perspective.

Funmation is just a licensor and localizer of the franchise. The change from Pioneer or Genon is just a US distributor issue.

I will never print anything of mine unless it is on a machine in my home or through a private source I trust. I have already had issues with these commercial printers stealing objects or allowing others to illegally sell objects on "markets" they run. I doubt I would print this either way. It would be easier to make it in clay, styrene, or resin. Actually it would be fun to do that, cast her in a obsidian like clear resin and use a real gem for the core. I rarely do any physical models anymore though as space just is too tight for models. Not to mention one move and they are usually wrecked.
 
Last edited:
Just goofing about to replicate the growth grooves on real crystal


clearly the map I am using sorta sucks, it is a 70s like wallpaper distorted up lol. Most of this is just that goofing about, as I really doubt I will use this look as it takes way too long to render.

In the end I am just delaying cutting up the base mesh to add in some more modeled detail. :p
 
Looks epic awesome to me :)

I wonder what a Starfleet / Ryo-ohki ship form hybrid ship would look like
 
Just goofing about to replicate the growth grooves on real crystal


clearly the map I am using sorta sucks, it is a 70s like wallpaper distorted up lol. Most of this is just that goofing about, as I really doubt I will use this look as it takes way too long to render.

In the end I am just delaying cutting up the base mesh to add in some more modeled detail. :p
Cool, I really like that texture.

It does look like it could have been grown.
 
Ok, did I broke her up into segments to apply better UVW and to start the faceting process. I have been looking for a better texture but I am not finding much out there. Got distracted with fooling with materials again and well the day is gone now FFFFFF


Last edited:
Actually took some time to create a texture for the ship vs bodging together things. Basically took some photos with the cel phone of a real crystal surface. Sadly I cannot find my larger examples to work from so it is just this little guy. The maps are not 100% and I still have some issues I think are related to caustics but the largest one is the debate on the detailed modeling I am starting to do as it really does not show up nor do the deep cuts kick light at all they seem to shade to dark. It is like modeling internal structure etc within the sealed object all come out without effects applied IE nothing is calculated. IE see the dim smoky render this shows up as a solid shape vs this transparent ghosty smoke look. I had hoped the inward cuts I was making would kick up light and shine like they do in a real crystal. I know getting the rainbow effect was a impossible thing without some deep work and well adding to the renders. AS is these take like 30 to 40min a pop. Then at times while the photons calculate they hang the render.


updated bump maps.

Bump is default 3 so once applied it would be more like 0.2 or something. I was almost tempted to throw a layer of noise on it to dirty up the bump but it probably would look horrible as bump never looks as sharp and crisp as I want.
Likely I will have to do what I wanted to avoid and that is UNWRAP the ship and do the textures that way. Advantage to that is unique details to the parts and a better control over the overall look. I doubt though I will unwrap and make each part unique. IE the spires would likely be cloned.

I am also second guessing the detail modeling pass as what I have done is barely visible in renders with the full surfacing applied.

Oh unwrapping is going to be fun, it looks nothing like what I have gotten used to using pre 2013. OH joy. not.
 
Start of the building of the bits


I really hate this part of things. heh Might take a break tomorrow to do something else. ATM it will look a bit naff but well the maps I was using prior were pretty naff looking. I am planning to use a different bump map but it depends how well I can light the subject I will pull the bumps from. I might also use various maps for other parts of the material IE translucency (though I think in solid mode this map slot is ignored) Last render set I have the same map in the rough slot gloss slot translucency and bump. Plan is to mix this up as I think Iw ant to separate the gloss, rough, and bump maps.
 
Well early pass with the new maps. Well the one map cloned into various slots mainly reflect and refract gloss slots.

btw this contains no bump maps and likely wont when I finish depends on the final surfacing when I start adding colour.
 
First pass textures are done. Time to move on to the next ones. There are a few colour spots mostly all refracted all over but those are loose bits of poly that max refused to let me flatten out and will need to be manually painted in. I will have to spend some time photographing for some of the other maps I want to use so those will take some time.


If you are not already a member then please register an account and join in the discussion!

Sign up / Register


Back
Top