• Welcome! The TrekBBS is the number one place to chat about Star Trek with like-minded fans.
    If you are not already a member then please register an account and join in the discussion!

Masao-class destroyer...

I got my upper saucer and bridge detail done and now starting to work on the underside. Many thanks for Round2's instruction and decal sheets.

 
Last edited:
Some rather subtle detailing here, particularly at the base of the dorsal where I felt it needed something.

 
Here we have dorsal and deflector housing details. From here, unless I can think of something I'm missing, it's on to windows and signage. Oh, actually I'm thinking of putting a gangway access on the port side of the saucer rim. We never saw that side and it would be a connective idea with what we saw in TMP.


If I may say so I think the detailing is helping to make this concept look more integrated and less the kitbash look in similar vein as the Reliant and Gemini designs. There is familiarity in the design and yet there are also distinctive elements that manage to fit with the familiar to make the whole coherent. Just my two cents.


I had a thought. I could see this class of ship patroling the Romulan Neutral Zone. Might have been neat to have seen one arriving at the end of "Balance Of Terror" to relieve the Enterprise just as it's departing after the events of that episode.


Now, how about U.S.S. Sarigar, NCC-1523.

The name might sound Vulcan or Andorian even if it's the name of a major character from Marvel Comics' 1980's title Aien Legion.
 
Last edited:
I had an issue yesterday that led to a "Doh!" moment for me. Somehow a guideline managed to get projected way off in the distance and far from the origin point in my SketchUp work space. It took me more than an hour to find it and in the interim it messed things up so I couldn't zoom in close on the parts I was working on. I tried all sorts of things to fix the problem and all to no avail until in desperation I looked around and saw this errant element. As soon as I deleted it everything went back to normal. Funny how a simple thing could cause so much grief. And I still can't figure out how the guideline managed to be placed so far from the origin point and the space where I was working.

Another "Doh!" moment arose while trying to solve my problem when I learned I could change SketchUp's field of view anywhere from 1 to 120 degrees. The default is 30 or 35 degrees. Changing the field of view changes how objects appear on the screen much like using different lenses on a camera. Until yesterday I had no inkling I had that option available.


On another note I might have a tip for those who might struggle placing the main registry signage on ships' hulls. This should work in principle in Illustrator as well.

First, lay out your registry number so it's oriented in line with the ship's centreline and where the middle of the set of numerals meets the middle of where the registry needs to be. At this point your numerals are in a straight line and not curved---that's coming---and at a right angle to the centreline.

Second, measure and draw a line from the centrepoint of your saucer to the top (or centre) of the numeral along the centreline. The centre might actually be in a space between numerals, but the goal is to get an anchor line from the saucer's centrepoint to the registry. Now copy that new anchor line and attach a copy to the centre of each individual numeral. The end result will be your series of numerals each with an exact same length line extending from their centres and all the lines are parallel to each other.

Third, now you need to know what angle or how many degrees of an arc (or the saucer) the registry will need to cover. It will probably be somewhere around 70 some degrees or so, about 35 degrees or so on each side from the ship's centreline. This is measured from the outer edge of the first and last characters in your registry. Once you have your angle you divide that by the length of your registry. So 70 some degrees divided by the registry's length or about 35 degrees divided by half the registry's length also works because you'll be working the next step from the centre of your registry. You will end up with 1 degree of angle or arc = to a distance or length in inches or centrimeters (or meters) depending on whatever system you're using. Now either write this value down or keep it in your calculator's memory.

Fourth, measure a character's centreline to the ship's centreline (or the registry's centreline, same thing) and multiply that by the value you just worked out above. The result will tell you at exactly what angle that character will sit on your ship's saucer. From that you can select the character together with its anchor line and rotate it to the desired angle. Once you've rotated the character use the anchor line to position it in place with the free end of the anchor line sitting on the saucer's centrepoint. Now repeat this with each letter, number and hyphen in your registry

Lastly, when finished erase or delete all your anchor lines and you're left with the characters of your registry sitting precisely and neatly where you want them to be.

It might sound involved, but after you do it once you find it a relatively simple and tidy way to get your curved registry into place.
 
Except for the gangway yet to be added to the port side and then colour tweaking, assigning materiels and rendering some space pics I think this puppy is done.


I tweaked the window arrangements so they wouldn't be identical to the Connie and to subtly suggest a different internal configuration because of the vessel being a different class with different mission profiles.

And so after thirty-five years this concept is finally fleshed out to my satisfaction. I think it looks like a credible TOS era starship variant without looking like a basic kitbash in similar fashion as the Reliant from TWOK and BolianAdmiral's Gemini design.
 
Thanks. In full disclosure there are one or two very minor flaws in this model, but since they're that minor...I'm not telling. :D

But I do think this is my best SketchUp model to date. Maybe not in terms of ambition or subject matter, but definitely in terms of execution. I had very few problems figuring out how to construct the parts and put them together. I also learned to have the foresight to build the model large (within the work space and dimensionally it is close to actual size of 700 some feet) which allowed me to handle finer details much more easily.
 
Excellent work, sir. I'm annoyingly tempted to bash one out of the 1/350 scale kit. But that would be insane. In. Sane.
:D
 
I'm annoyingly tempted to bash one out of the 1/350 scale kit. But that would be insane. In. Sane.
:D
C'mon, ya know you wanna...


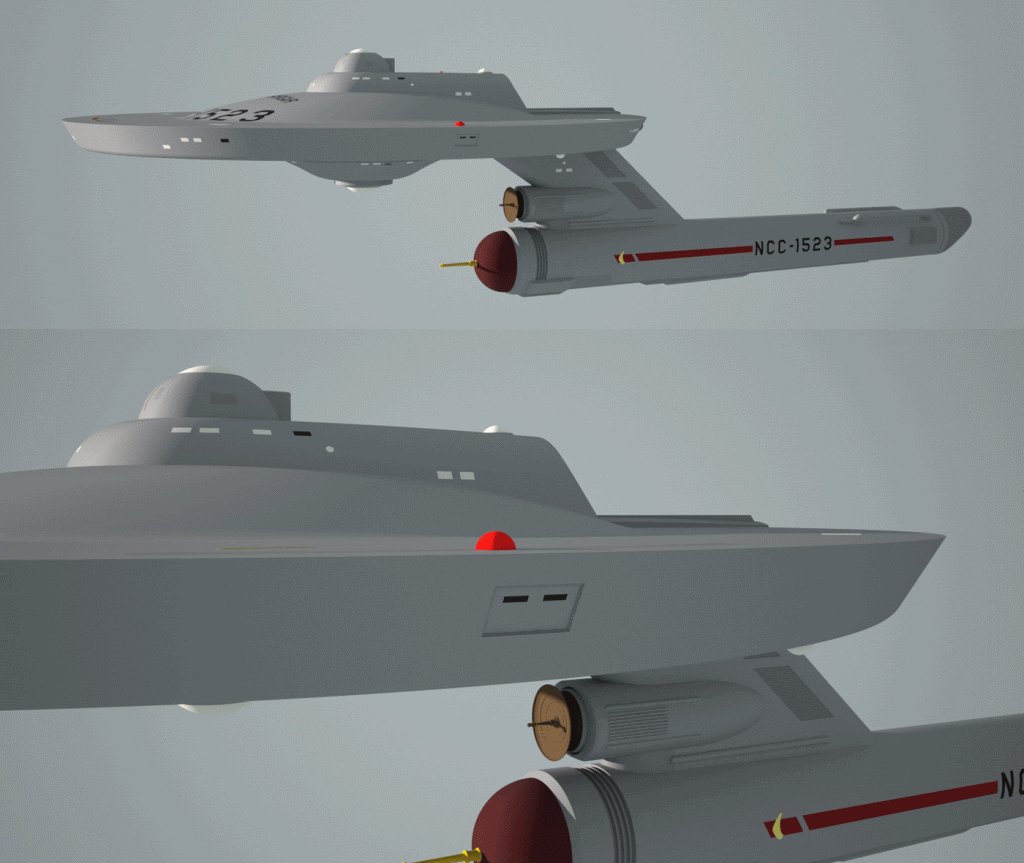
Gangway installed on the port side. I also intend to add the ship's name and registry on the gangway doors. And I fixed a small design flaw on the rings behind the nav-deflector although no one will probably notice and you can't really see it unless you're really up close.


Forbin, in the event you might want to build one of these from scratch or kitbash a Round2 1/350 scale TOS E I will be generating some line drawings that could be used for reference.

Note, though, that this design doesn't salvage that much from the familiar Connie. You have the saucer, bridge dome, the dorsal and parts of the nacelle. Everything else would pretty much have to be fabricated from scratch.

I didn't use the standard Connie nacelle becaue I found it just a bit undersized and the dorsal was overlapping the sides of the nacelle a little too much for my tastes. So I increased the diameter of the nacelle about 4-5 percent and kept everything else the same. The inboard trench would need to be filled or fabricate a nacelle without a trench. The only interchangeable parts would be the intercoolers, the bussard rectangles, the nacelle dome spike (if one makes the Pike era version) and the flux chillers. I rationalized the slightly larger nacelle (for appearance sake) by reasoning a single nacelle has to do the job of two and the reactor setup (from the inboard trench) is different so a slightly larger unit is needed to house the extra mechanicals.

The dorsal is slightly longer than the Connie's and, of course, there's the extension at the forward bottom end. The nav-deflector housing would have to be fabricated from scratch as does the new hangar section. The clamshell doors aren't the same as the Connie's, but the homing beacon dome over the hangar is the same. The deflector dish is the same design as the Connie's but it's significantly smaller. It's possible one could be used from a smaller kit or an aftermarket part---maybe a correct aftermarket dish for the 18" or 22" AMT TOS E. That could apply to the rings behind the deflector as well.

The paint scheme is largerly the same as the Connie's.
 
Last edited:
Outstanding work!

As for building this from a 1:350 E, I suppose one could wrap a few layers of thin sheet styrene arround the nacelle to bring it to the new diameter... The only tough part would be to find something to make the dome a bit larger also, but if it's only 5% than maybe you coiuld just use the kit one?

I don't (yet) own the 1:350 so I'm not certain how the parts are laid out...

--Alex
 
Last edited:
I don't (yet) own the 1:350 so I'm not certain how the parts are laid out...

--Alex
I do have one although not yet built. It's not like previous kits where the nacelles were cast almost all in one peice. The domes and aft cowlings and nacelle rings (behind the domes, the trench, reactor loops, intercoolers and flux chillers are all separate pieces.
 
If you are not already a member then please register an account and join in the discussion!

Sign up / Register


Back
Top