-
Welcome! The TrekBBS is the number one place to chat about Star Trek with like-minded fans.
If you are not already a member then please register an account and join in the discussion!
You are using an out of date browser. It may not display this or other websites correctly.
You should upgrade or use an alternative browser.
You should upgrade or use an alternative browser.
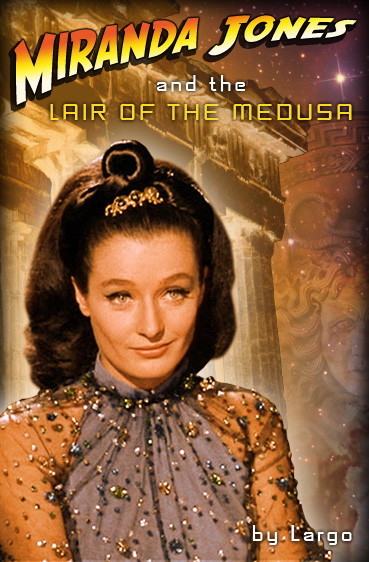
december art challenge - largo
- Thread starter largo
- Start date
how it's made...
http://www.bin.sh/images/projects/star_trek/miranda_jones/layers.gif
http://www.bin.sh/images/projects/star_trek/miranda_jones/layers.gif
For that background piece with the columns - I'm guessing you ran thru the various filters...all that "add/subtract/multiply/divide/dodge/burn/wash/soak/rinse/spin/nothin' but net" stuff. Is there a tutorial somewhere out there that explains all those things and when you use one vs another and why?
the first step was to mask out the sky, in this case i just used photoshop's magic wand tool to make the rough selection, then switched to quick mask mode to clean it up a little. the mask is actually applied to a layer set containing the columns layer. you'll see why in a second.
second step was to invert the layer. i use adjustment layers whenever possible, so that i can disable effects or adjust settings. the adjustment layer goes into the same set as the columns, so that the mask is applied to it as well, and only the columns are inverted.
third step was to colorize the columns via a hue/saturation adjustment layer. fourth, boost the contrast (again, an adjustment layer). finally, drop the opacity of the layer set to 50% and create a orange backglow on the next layer down (new layer, select area from columns mask, fill with orange, gaussian blur 30 px or so).
you usually don't have to do anything terribly complex to get good results, just simple adjustments applied in intelligent ways.
I see this as a graphic novel. 
I like it though.

I like it though.
Similar threads
Contest: ENTER
December 2024 Art Challenge -- A Prophecy Foretold
- Replies
- 16
- Views
- 1K
- Poll
- Replies
- 5
- Views
- 510
- Replies
- 16
- Views
- 1K
Contest: ENTER
February 2025 Art Challenge -- Gift Shop Goodies
- Replies
- 12
- Views
- 763
If you are not already a member then please register an account and join in the discussion!


