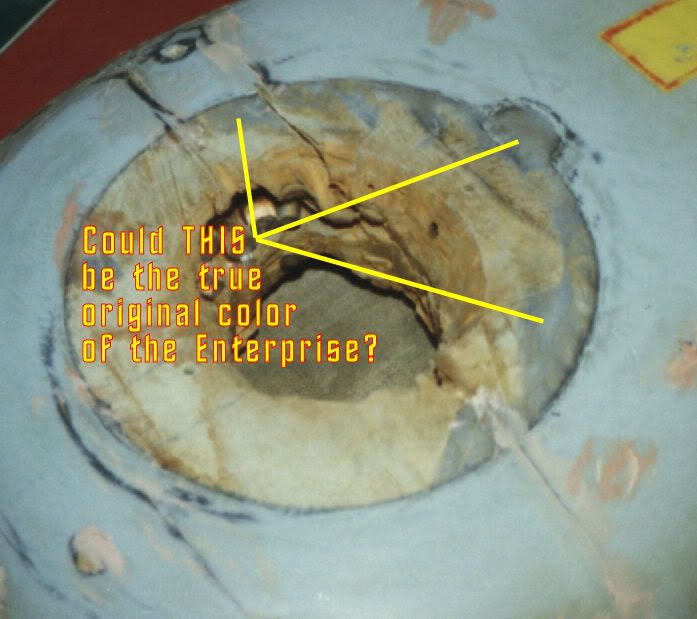
I forget who it was, but somebody over on one of the Hobbytalk boards (Several years ago, possibly around ten years ago) claimed to have managed to get ahold of a piece of cardboard that had allegedly been used as a mask while painting the Enterprise in the first place. He was able to find commonly available paint chips from national chain stores that matched the over-spray on the cardboard very closely and posted all of his research for the benefit of us physical modelers. His conclusion was that the Wal-Mart paint chip for their color named "Concrete" was a spot on match, something like a pale greenish gray. I went to Wal-Mart and nabbed said color chip and used it for mixing my own color to paint a series of Trek models I was working on at the time. I have since lost the chip (I might still have it storage someplace) but still have the models I painted and now I use that to check against when I'm adjusting the color of current projects.
Now assuming this tall tale is true, then that color we see on the top of the Enterprise's saucer is only slightly faded from what it began life with. In that case, I suggest that the darker gray we see under the decapitated bridge is indeed a primer coat of paint. An essential element when building a wooden model that you don't want to look like wood when finished. On the other hand, if this bed time story is not true, then I suppose the darker gray could be an unfaded color, but I doubt it, since I don't think the model ever sat in direct sunlight for long stretches between it's working days and it's "restoration." I don't think the "many abuses" it was subjected to were such that the paint would be that prone to fading.
My $0.02.
--Alex
")


")
 ).
).